• Home
  • About Tracy
  • Contact Me

Using Time Wisely

Organized to save money, energy, and time

  • Email
  • Facebook
  • Pinterest
  • RSS
  • Twitter
  • YouTube
  • Document Organization
    • Overview
    • Box 1
      • Credit Report/Cards
        • Credit Reports
          • Credit Updates
          • Credit Scores
        • Credit Cards
      • Personal
      • Home Ownership
      • Vehicles
    • Box 2
      • Life Insurance
      • Major Medical
      • Tax-Favored Programs
      • Prescriptions
      • Dental & Vision
      • Special Health Policies
      • Short-term Disability
      • Long-term Disability
      • Personal Insurance
    • Box 3
      • Social Security Documents
      • Retirement
      • Investments
      • Estate Planning
      • Tax Records
  • Household
    • Cleaning
    • Maintaining
    • Organizing
    • Scheduling
      • Laundry
  • Event Planning
    • Assisting
    • Attending
    • Coordinating
      • Birthday Party
      • Christmas
      • Dinner Party
      • Fall Festival
      • Field Trip
      • Lemonade Stand
      • Thanksgiving
    • Learning
    • Preparing
    • Serving
  • Miscellaneous
    • Communication
      • Customer Service
      • E-mail
      • RSS Feed Reader
    • Goals
    • Organization
    • Time Management
      • To Do List
  • Food
    • Food Prep
    • Grocery Shopping
      • Lists
      • Pricing
    • Menu Planning
    • Recipes
    • Stockpile
  • Family Activities
    • Going Out
      • Free Outings
      • Inexpensive Outings
      • Summer
    • Rewards
      • Good Grades
      • Reading
      • Summer Reading
    • Staying at Home
  • Stretching Your Dollars
    • Daily Deals
      • Groupon
      • LivingSocial
    • Drugstores
      • CVS
    • Gas Prices
    • Gifts
    • On-line Shopping
    • Pictures
    • Products
    • Restaurants
    • School Items
    • Tips
You are here: Home / Archives for 2011

Archives for 2011

Organizing: Kitchen Drawers – Part 1 of 2

December 12, 2011 by Tracy

As I went to my kitchen drawer for a cooking utensil and found a cluttered mess, I knew it was time for an organized makeover. After months of stashing unused or unknown items in my kitchen drawers, my valuable kitchen space was getting used by odds and ends. No more. I declared – time to take back my kitchen and rid these drawers of clutter.

Kitchen Drawer #1 - Before

Drawer #1

This drawer houses many of my spatulas, spoons, ladles, pizza cutters, and other kitchen utensils. Instead of all the similar items grouped together, all the utensils were just stashed in the drawer. After moving the items around to find the one utensil I needed, it was time to begin the reorganization.

    1. Pull out all the bulky utensils and put on the counter
    2. Sort the items into piles
    3. Wipe out drawer
    4. Replace the drawer liner
    5. Place similar items together in the drawer
    6. Give each utensil a home
    7. Put away the remaining items
    8. Enjoy the organized and now clutter-free kitchen drawer
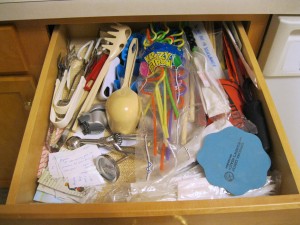
Drawer #2

Kitchen drawer #2 - Before organizing

Once I began organizing one cabinet, the momentum began and I tackled a second drawer as well. This drawer was more of a mess. I still had all the plastic utensils from soccer season which was in (ahem) May. These drawers were overdue for a good reorganizing.

Once again I followed the above eight steps, and removed lots of excess and unused items from this drawer.  When I replaced the needed items back in the drawer, I was left with all these other items to put away, trash, or donate.

When all the extra items had been removed and the remaining items neatly organized in the drawers, I felt much better. I could see all the items without sorting through the clutter to find that serving utensil.

Kitchen Drawer #1 - After organizing

Kitchen drawer #2 - After organizing

The results were worth taking fifteen minutes to organize. In using time wisely, taking a few minutes to organize one drawer, cabinet, or shelf will give you momentum as you seek to start, continue, or keep your home organized.

Question: What household organizational project is on your agenda? Please add your answer to the comments.

Filed Under: Household, Organizing Tagged With: kitchen

Personal Insurance: Annual Enrollment Reports

December 11, 2011 by Tracy

Creating a place for each document AND keeping those documents in the correct file gives you freedom from clutter. To keep the clutter at bay, I have 4 stackable trays on my desk. The top tray holds all the paperwork that needs to be processed. This 2-inch tray gets filled very quickly.

In fact, too quickly.

As the pile mounds, I choose a time to sort, schedule, file, and research these items.

With many items coming through our household, I usually keep one or two on-going tasks that need to be done in the pile. However, having a designated place for each bill, statement, important document, and insurance item makes filing day manageable.

In keeping the insurance documents manageable and off my desk, I have designated a home for them in Box 2 of my important documents filing system. Behind our summary insurance page in the first file opening, I keep our annual enrollment reports.

Most of our insurance policies are through group plans at Paul’s work. Each year, we attend an insurance meeting with a representative to select, review, and/or change our insurance selections. During odd years (i.e., 2011), we have open enrollment, where we can add, delete, or change any insurance we hold through these plans. Next year during an even year, we will have annual enrollment, where only some of the insurance policies are available for additions, subtractions, or changes.

The minimum number of documents I need to house in this first file opening of my insurance documents is two years worth. Since the open enrollment covers two years with only limited changes available the second year. However, I currently have six years worth for reference and confirmation of our choices. You do not need to keep this many. This is just my personal preference.

Annual Enrollment Reports

In this file slot, I keep these following documents:

    • Business card of representative from insurance meeting
    • Summary of new elections
    • Summary of payroll deductions
    • Summary page of each policy change
    • Copy of any new enrollments with premium charges
    • Statement of Benefits
    • My notes and calculations for future comparison
    • Insurance booklet which explains all the new changes for the current enrollment period

All these documents are then stapled together. I write the enrollment year on the front of the documents and house them in this file opening. In January, when the new premiums take effect, I will refer to these documents to verify that the payroll deduction amounts are accurate.

I will also refer to these documents during annual enrollment next year before our insurance meeting with our representative. For the most part, these documents just reside in this file until needed.

By having a designated place, I am able to keep my desk free from excess clutter and can quickly locate these documents in the file. As you organize your documents, the process may be slow, but the clutter-free office area will be a welcome reward. Keep plugging along while using time wisely. Happy organizing!

Question: Do you have open enrollment each year, or do you alternate between open and annual enrollment? Please add your answer to the comments.

Filed Under: Document Organization, Personal Insurance, Box 2 Tagged With: insurance, personal

Feed It Forward with Restaurant.com: Free $10 eGift Cards

December 10, 2011 by Tracy

Photograph Credit: Flickr (daf_dab)

Are you considering paring down your Christmas list this year due to unavailable funds? Keeping within and under your Christmas budget may be getting tighter with tough decisions to make.

Do you still desire to give to those distance relatives, friends, and helpful acquaintances? Need some help? Enter, Feed it Forward. This is a fabulous program to help in stretching your dollars. You can gift $10 restaurant.com e-Gift cards to 40 people per day for FREE!

Photograph Credit: Feed It Forward

Feed It Forward is in its fourth year. Each year the program has grown. Need more details? These descriptions are located on Feed It Forwards’ web site:

Photograph Credit: Feed It Forward

Ready to spread some Christmas cheer? This is so exciting!

Getting Started

1. Click on this Feed it Forward link

2. Select the red “START GIVING FREE GIFTS” button

3. Sign in with your Feed it Forward account, Restaurant.com account (which you already have, right?), create a new account, or log in through Facebook

NOTE: Since I signed up with Restaurant.com using my junk e-mail account, the eGift cards are sent with that e-mail address. I have already received responses from concerned friends since they did not recognize the e-mail address. After my explanation, they understand. But if you use your junk e-mail account to register with Restaurant.com, be ready for some skeptical feedback from your recipients.

Sending the Gifts

1. Select your friends either through your e-mail account, Facebook, or enter their e-mail addresses manually

2. Choose your gift card design, greeting, and personal message

3. Confirm and your e-Gift will be on its way

Enjoy sending surprises to your family and friends each day through Christmas Day (while supplies last). Besides the joy of giving, enjoy stretching your dollars by gifting while staying within your Christmas budget. Going through the process the first day will take the most time. Once your account is setup, you will be able to breeze through while using time wisely. Keep stretching your dollars and Merry Christmas!

Question: To whom are you gifting these eGift cards? I sent them to my family and then friends, who are struggling financially this Christmas season. Tomorrow, I get to gift 40 more. What a blessing!

Filed Under: Gifts, Stretching Your Dollars, Restaurants Tagged With: Feed It Forward

Lowe’s Build and Grow: Coal Car

December 9, 2011 by Tracy

Photograph Credit: Lowe's

After attending the Home Depot Kids Workshop last weekend, our family should have stopped across the street at Lowe’s. Branching out of their normal second- and fourth-week of the month projects, Lowe’s began a three-week project: a train.

Last week, the project was the caboose. If you missed it, like our family, do not fret. There are still 2 additional sections to make for your train.

What: Coal Car

When: Saturday, December 10, 2011

Where: Your local Lowe’s home improvement store

Time: 10:00 a.m. to 11:00 a.m.

These clinics fill up quickly. Be sure to register your attendance at your local Lowe’s and arrive no later than 10:15 a.m. to the event. For other tips and details on the Lowe’s Build and Grow clinics, refer to my detailed post here.

Photograph Credit: Lowe's

After this Saturday’s event, the next Lowe’s Build and Grow project will be on Saturday, December 17, 2011, building the engine.

You can register for both the December 10 and 17 events through Lowe’s web site. These events are filling up fast in our area. Hope you can still get a spot.

To preview more upcoming events, be sure to check Using Time Wisely’s Facebook events page. New activities are added periodically, so check back often.

Enjoy your family activities this weekend!

Filed Under: Going Out, Free Outings, Family Activities Tagged With: Lowe's

Grocery Shopping: Giving Groceries a Home – Part 1 of 3

December 8, 2011 by Tracy

Photograph Credit: Flickr (Jerry Whiting)

Are you seeing any increase in your savings? Have you implemented any changes to your typical grocery shopping trips? Though saving 40-60% each week is my goal, be thrilled with saving 10-20% as you implement a new savings strategy. Saving little by little will add up as you continue to find tricks that work for you.

As we near the end of this series on my food cycle, here is a quick overview up to STEP SIX out of seven total steps:

My Menu Planning Process

Step One: Choosing a menu plan.

Step Two: Adding meals to your plan from the food you have on hand.

Step Three: Continuing to add meals.

My Grocery Shopping Process

Step Four: Creating grocery lists.

    • Part 1: Identify needed items.
    • Part 2: Select sale items.
    • Part 3: Compile a list for each store.

Step Five:  Gathering your savings.

    • Part 1: Entering the store.
    • Part 2: Shopping your list.
    • Part 3: Checking out.

Step Six: Giving your groceries a home.

    • Part 1: Unloading your savings.
    • Part 2: Organizing your savings (future post).
    • Part 3: Preparing for future savings (another future post).

Surviving the grocery store process with three active children and lots of savings, I return to give my savings a home. Before relaxing on the couch with a little one on each side, there is still work to be done. Having accomplished deep savings, I do not want these groceries to spoil. Therefore, I begin unloading all these savings.

Unloading the car

With my children occupied either inside or outside, I begin by bringing in the bags and boxes. My long kitchen counter holds most of the bags. If I need additional space, I will either moved to the counter by the refrigerator or place my non-food savings on the floor. Once my vehicle is unloaded, I close the trunk, car doors, and garage door before returning to the kitchen.

Unpacking the groceries

With the bags on the counter, I start at the beginning of my counter as I walk into my kitchen by taking all the items out of the bag and placing them on the counter. The bag is then either folded (reusable) or tossed on the floor (plastic) for later. When one bag is done, I then proceed to the next until all the groceries are on the counter and all the bags are off.

Unloading the car and unpacking the groceries on my counter allows me to see where I need to concentrate. The next post in this series will explain how I organize my savings from this point. Though this process seems to take quite a bit of time, the more it is repeated, the quicker I become.

This process works for me. If you have a small space in which to work, then find a system that helps you be efficient. Willing to try a new way of doing things helped me save 40-60% off my grocery bill. You can do the same. Just be willing to try. Happy experimenting!

Question: What odd-to-you idea have you tried that really worked beyond your expectations? For me, making a menu with what I had on-hand and then shopping only the sales was a “weird” idea that really works! Now I cannot go back to paying full price for items that will soon be on sale. Keep your comments coming! Love to hear your answers.

Filed Under: Grocery Shopping, Food Tagged With: grocery shopping

« Previous Page
Next Page »

Welcome to Using Time Wisely!


Presenting organizational tips and tricks to save you money, energy, and time.

To access 5 Ways to Using Time Wisely Today, click "like" on my facebook page and join in on the journey of Using Time Wisely.

Looking for something?

Email Newsletter

Sign up to receive email updates and to hear what's going on with us!

Copyright © 2025 · Lifestyle Pro Theme on Genesis Framework · WordPress · Log in