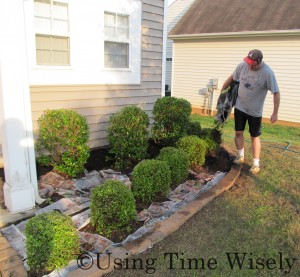
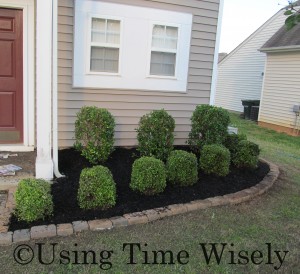
Hoping to show you our completed project today, I can only show a half-finished yard. Though we only have about half an hour of work left to complete the two smaller beds, we did not finish in time for this post.
In using time wisely, we spent the weekend with friends celebrating birthdays and enjoying each other’s company. If all goes as planned, our last two beds will get finished this week.
Thankfully, the two larger areas are complete and look so much better than when we started. Our yard is improving which is progress. The weed killer applied to our grass has reduced the weeds and improved our grass. Love it when one application solves the immediate problem. Now, we will progress to fertilizing.
In earlier posts, I humbly shared our yard’s overgrown weeds and how we removed the edgers and cleaned out the beds in part 1. Then in part 2, I showed how my husband Paul prepared the beds and then treated the beds. In part 3, I will present the finished product after adding new mulch and spreading it in our long bed and under our tree.
Add New Mulch
Wow, mulch bags are heavy! Having loaded the mulch on a cart at Lowe’s, then from the cart to our van, next from the van to our garage, and finally from the garage to the beds tired out Paul. Moving those bags so many times brought shoulder and back pain for a few days to Paul. Yet, he continued to work to beautify our yard. 🙂
For our long bed, Paul added four bags of mulch. The bed under the tree took 2 bags, and the 2 smaller beds together should take 3 bags.
Spread the Mulch
Adding four bags of new mulch to the long bed, Paul spread it evenly and adjusted any edgers to keep the bed’s appearance uniform.
In repeating this process under the tree, the edgers needed more adjusting to keep the mulch from cascading into the grass.
Add More Mulch
Once we spread the other 2 bags of mulch in the last 2 beds, we will begin filling in bare spots. We will use the last 3 bags of mulch to create a uniform appearance in all four beds.
In using time wisely this spring to improve our property, we completed our spring yard work for 2 of our 4 beds by adding new mulch and spreading the mulch. Once the other two beds are complete, we will add more mulch to unify all 4 beds.
As you plan your spring yard work projects, take it step by step. With a little planning and lots of hard work, your yard will improve little by little. Enjoy the process and happy improving!
Question: How’s your yard work coming along?


Looks great Tracy! It’s sure a lot of work, but looks great when you get it to where you want it! Our gardens look not too bad, but our front lawn is a never ending problem 🙁 Oh well, one step at a time! LOL
Cheers
Thanks for the comment, Jen. When I wrote the post last night, I realized that I had not taken a picture of the tree. Oh well, I’ll do a quick follow-up at the end of spring with the final results. I’m thrilled that the weeds have not surfaced. I think the combination of the newspaper and the weed killer is working. Yeah!