• Home
  • About Tracy
  • Contact Me

Using Time Wisely

Organized to save money, energy, and time

  • Email
  • Facebook
  • Pinterest
  • RSS
  • Twitter
  • YouTube
  • Document Organization
    • Overview
    • Box 1
      • Credit Report/Cards
        • Credit Reports
          • Credit Updates
          • Credit Scores
        • Credit Cards
      • Personal
      • Home Ownership
      • Vehicles
    • Box 2
      • Life Insurance
      • Major Medical
      • Tax-Favored Programs
      • Prescriptions
      • Dental & Vision
      • Special Health Policies
      • Short-term Disability
      • Long-term Disability
      • Personal Insurance
    • Box 3
      • Social Security Documents
      • Retirement
      • Investments
      • Estate Planning
      • Tax Records
  • Household
    • Cleaning
    • Maintaining
    • Organizing
    • Scheduling
      • Laundry
  • Event Planning
    • Assisting
    • Attending
    • Coordinating
      • Birthday Party
      • Christmas
      • Dinner Party
      • Fall Festival
      • Field Trip
      • Lemonade Stand
      • Thanksgiving
    • Learning
    • Preparing
    • Serving
  • Miscellaneous
    • Communication
      • Customer Service
      • E-mail
      • RSS Feed Reader
    • Goals
    • Organization
    • Time Management
      • To Do List
  • Food
    • Food Prep
    • Grocery Shopping
      • Lists
      • Pricing
    • Menu Planning
    • Recipes
    • Stockpile
  • Family Activities
    • Going Out
      • Free Outings
      • Inexpensive Outings
      • Summer
    • Rewards
      • Good Grades
      • Reading
      • Summer Reading
    • Staying at Home
  • Stretching Your Dollars
    • Daily Deals
      • Groupon
      • LivingSocial
    • Drugstores
      • CVS
    • Gas Prices
    • Gifts
    • On-line Shopping
    • Pictures
    • Products
    • Restaurants
    • School Items
    • Tips
You are here: Home / 2012 / Archives for April 2012

Archives for April 2012

Blue’s Clues Birthday Party – Part 2 of 3

April 17, 2012 by Tracy

Blue's Clues birthday partyLast week I shared how Paul and I chose our toddler’s 2-year-old birthday party theme of Blue’s Clues. After making the theme choice, I had more decisions to make.

Since my two older children had a Blue’s Clues party for their first birthday, I had many items. However, I had no games. With my toddler joining in the games of her older siblings, we had to have a game of Blue’s Clues.

For those unfamiliar with this children’s program, Blue is a female dog that does not talk. To get her idea across, she marks three clues with her paw print to help us find the answer. Each segment follows the same basic sequence with the clues changing from episode to episode. The repetition is fantastic for learning sequence and order.

Keeping the guest list to our family, extended family, and one close friend’s family, I planned the following 2-hour morning birthday party for 8 adults and 6 children (ages 2 to 6):

Blue’s Clues Birthday Party Itinerary

Welcome. Greet each guest as she arrives, and escort to the living room to play or color Blue’s Clues coloring pages.

Games – Part 1 of 3. When all the guests arrive, the games will begin.

1. Find the First Clue: In determining what Blue wants to do today, we will need to play Blue’s Clues. With the first clue hidden, the participants will search for Blue’s Clue. Once found, we will add the clue to our handy-dandy notebook.

2. Hide and Seek Blue: Prior to the party, I will hide six different Blue’s Clues items (2 figurines, 2 stuffed animals, and 2 bath mitts). Each participant will seek one item.

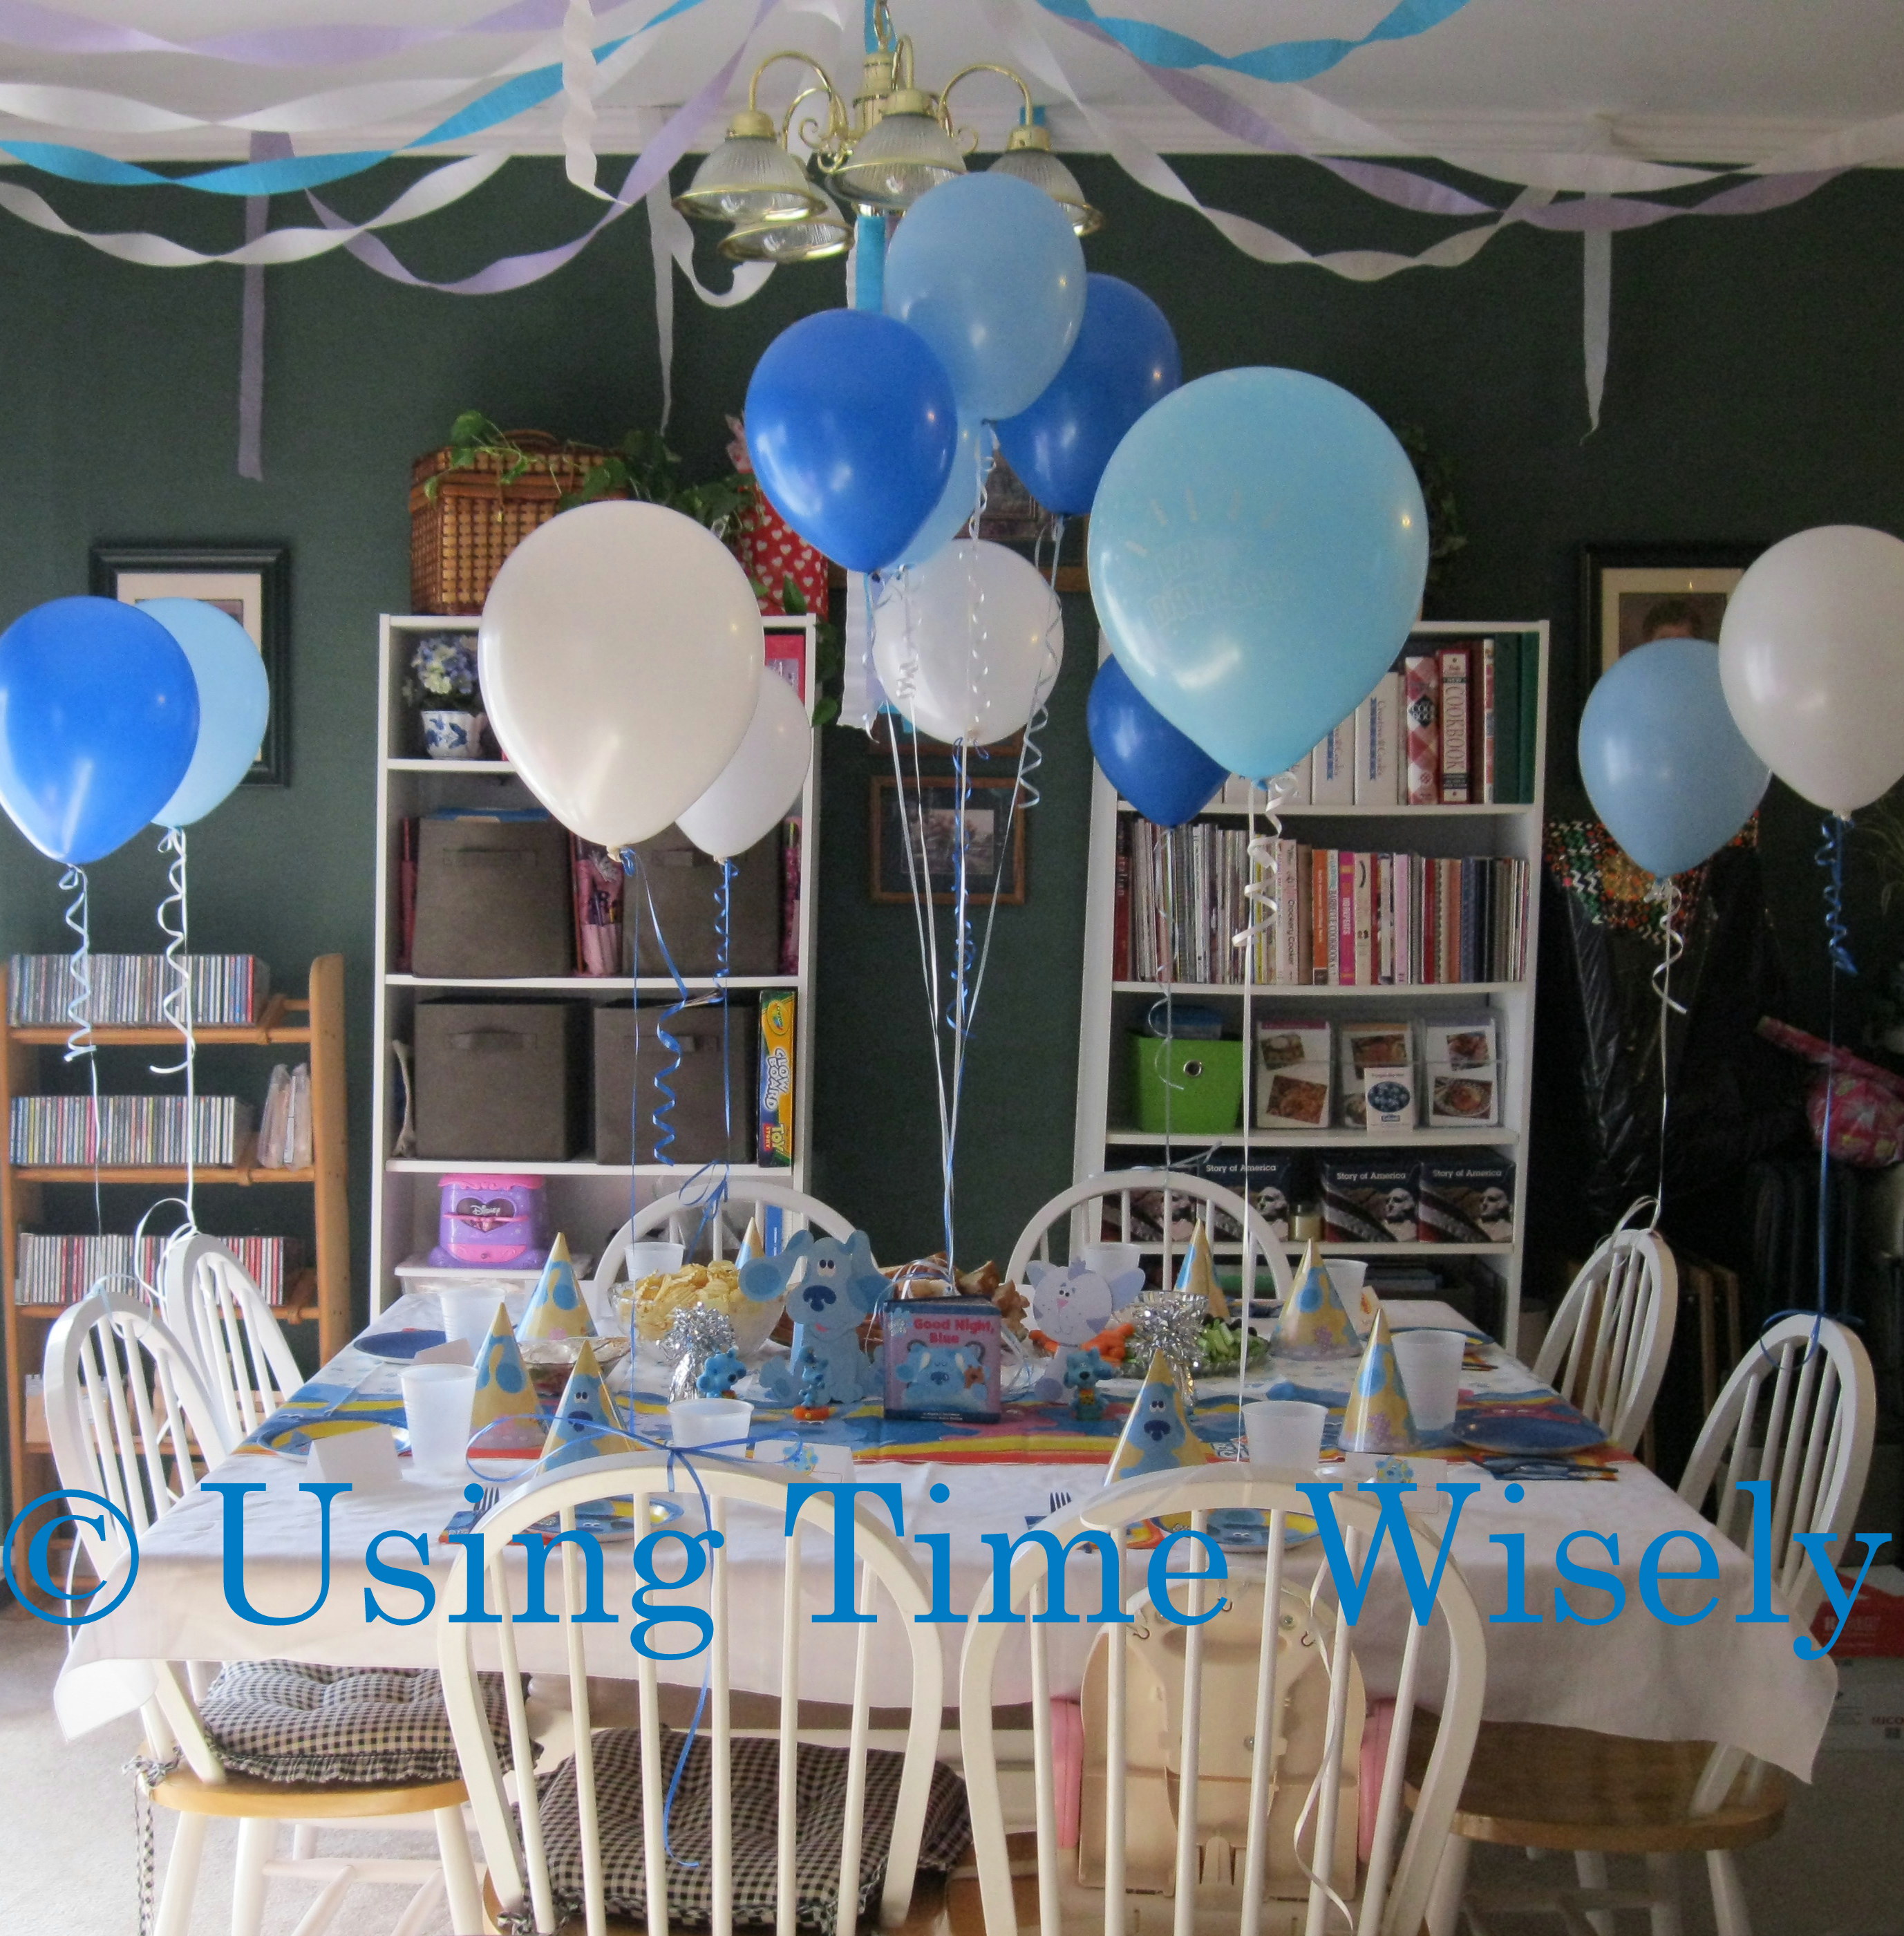
Lunch. The table settings will include name cards for each child. The adults will help serve the children in the dining room and then relax and eat in the living room.

The menu:

  • Ham and cheese sandwiches
  • Chips and dip
  • Carrots, celery, and olives
  • Fruit salad: strawberries, cantaloupe, and bananas

Games – Part 2 of 3.          

3. Pin the Paw on Blue: I will cut out 6 paw prints and write one participant’s name on each one. After blindfolding one child, he will turn around and placed the paw on the printout. The younger participants will either close their eyes or just stick the paw print on Blue.

Open Presents.

Games – Part 3 of 3.

4. Find the Second Clue: Another paw print is hidden. When the participants find it, we will draw that clue into our handy-dandy notebook.

5. Find the Third Clue: The participants will find the last paw print. We will add the last clue to our handy-dandy notebook and decipher Blue’s Clues.

Sing, Blow Candle, and Cake.

Thank you and Goody Bags.

Play with new toys and goody bag items.

With the itinerary set and most of the decorations unpacked, I waited for help to arrive before decorating the space and preparing the food.

With a plan in place, I scheduled time for play, games, food, other games, presents, more games, dessert, thankfulness, and goody bags. Next week in Part 3, I will finish this Blue’s Clues birthday party series with our execution of the planned itinerary.

Question: How detailed do you plan for a child’s birthday party?

Filed Under: Event Planning, Coordinating, Birthday Party Tagged With: Birthday party

Spring Cleaning: 7 Steps to Making a Bed

April 16, 2012 by Tracy

Photograph Credit: Flickr (Yew Tree House)

Somehow just making the bed brightens my bedroom. I can have everything picked up but the room still looks messy with a disheveled bed.

I realize there are days when just flinging the comforter over the sheets will have to do. I get that because it happens at my house, too.

But during spring cleaning, I want to wash all the linens and setup the beds correctly. To get the same look each day, I follow these 7 steps to making a bed.

Step 1: Bed Skirt

For the master bedroom, we place a bed skirt on the box spring to keep dust from collecting under the bed and to hide the contents under our bed. Since the bed skirt gets dusty, I strip the bed completely and wash all the linens including the bed skirt.

When time to replace, I lay the bed skirt out on the box spring with the ruffle falling on the left, bottom, and right of the bed. The straight edge lays across the top of the bed by the headboard.

Step 2: Flip the Mattress

If your mattress needs flipping like ours, I get help when putting the bed back together. With the mattress in place, I check the bed skirt for alignment and make any adjustments. I like to keep the bed skirt even all the way around the bed.

Step 3: Mattress Cover/Pad

Mattress Cover

At one time we placed a plastic mattress cover on the mattress. However, the bed crinkled when we turned over and stayed warm. The heat would be fine during the winter, but during the summer months, the bed was uncomfortable. So, I took the mattress cover off.

Mattress Pad

To protect our mattress, we place a quilted mattress pad over the mattress. After washing, I place the pad on the mattress using the “X” pattern.

The “X” pattern: Start at the top of one corner and then stretch the pad to the opposite bottom. Then I repeat on the other side.

By working in an “X” pattern, the pad does not slip off the mattress. Of course, when I have help, the task goes quicker.

Step 4: Fitted Sheet

When working alone, I work in the “X” pattern. The sheet stays in place without slipping off the mattress pad.

Step 5: Cover Sheet

I place the wide hem of the cover sheet at the top of the bed with the “good” side facing down. I then fold the top down a few inches. Making sure that the sheet is even on both sides, I then tuck the sheets under the foot of the bed.

TIP: If you have a tight fit or newly polished nails, then consider using a wooden spoon to tuck in the sheets.

If you want to make hospital corners, here is a great pictorial post for that angled look.

Step 6: Comforter

During the winter, we sometimes keep a blanket over the fitted sheet, but usually just our comforter lies on top. When adding to the layers of the bed, I try to keep the comforter even on both sides and cover the sheets. If the cover sheet is hanging down, then I get the wooden spoon or just tuck the sheet under the mattress.

Step 7: Pillows

When placing the pillows into the pillowcases, I prefer to insert them tag-side first. This little trick saves me time tucking the tag in when making the beds in the morning.

I also place the pillows that go in the shams inside pillow protectors. These plastic sleeves protect the pillows which keeps them in good shape for a long time.

With the linens washed and placed on the bed, making the bed only takes a few minutes. By working on one side and then moving to the other side, I can make our bed in about 2 minutes. But if the sheets are falling off the mattress cover and rolled into a ball, then making the bed will take more time.

In using time wisely, I concentrate on setting up the bed to save time while making the beds most mornings. 😉 Happy spring cleaning!

Question: What other tips do you have for using time wisely while making your bed? 

Filed Under: Cleaning, Household Tagged With: spring cleaning

Tax-Favored Programs: Dependent Care Spending Account

April 15, 2012 by Tracy

Excitement time! Today, we will complete our fourth category in our insurance document file. Yeah!

Remember: Your file will hold the insurance policies you carry. If you do not have one of these policies, then just skip it. This series is not meant to place pressure on you to buy more policies. I only share how I have organized our important documents.

Within this category, we have filed our Health Savings Account (HSA), Pre-Tax Group Insurance Premium, and Medical Spending Account documents. The last set of documents in this file opening is the Dependent Care Spending Account paperwork.

NOTE: I have never had this type of spending account. Though I have researched and understand the savings through this program, I can only offer information and not my experiences.

I have had the wonderful privilege of staying home with my children, and when needed, we have close family and friends to babysit for us. We are very fortunate and have not needed a dependent care spending account. However, the benefits are worth having one if you incur dependent care expenses which is why I am devoting a post for this type of account.

Dependent Care Spending Account

Defined

A Dependent Care Spending Account is an IRS tax-favored account you can use to pay for your eligible dependent care expenses to make sure your dependents (child or elder) get care while you and your spouse (if married) are working. Withdrawn from your salary before deducting taxes, these funds allow you to pay your eligible expenses tax-free.

Types of Dependents

Check your policy, but usually dependents are individuals residing in your household for at least eight hours a day including:

      • Children 12 years or younger and
      • Adults or children mentally or physically incapable of self-care

Eligible Expenses

Changes occur to the law and policies, so check your policy. But some of the eligible expenses may include:

      • After school care
      • Baby-sitting fees
      • Day care services
      • In-home care/au pair services
      • Nursery and preschool
      • Summer day camps (but not overnight camps)

Ineligible Expenses

Most Dependent Care Spending Accounts will not reimburse for the following expenses:

      • Books and supplies
      • Child support payments or child care if you are a non-custodial parent
      • Health care costs
      • Tuition costs
      • Services provided by your dependent, your spouse’s dependent or your child who is under age 19

Cost

Possible Fees

Our policy would charge a $2.50 administration fee per month along with our $.12 per month for the pre-tax group insurance premium (since these fees get paid with pre-tax dollars). Each policy has its own fees and regulations. Just check with the employer for specific requirements.

Availability of Funds

Once you sign up for a Dependent Care Spending Account and decide how much you want to contribute, the funds available to you depend on the real funds in your account. Unlike a Medical Spending Account, the entire annual amount is not available during the plan year, but rather after your payroll deductions get deposited.

For example, if you incur $500 in dependent care expenses and your account from payroll deductions has a $400 balance, then you can only get $400 in reimbursement. Once the next payroll deduction amount reaches your account, you can request the remaining $100 reimbursement. This is only an example. Your provider may only allow one reimbursement per bill. If that is the case, then you would need to wait for the next payroll deduction to submit the $500 bill for reimbursement.

Losing your Allotment

Similar to the Medical Spending Account, any money remaining in your account cannot be returned to you or carried forward to the next plan year. Be conservative in your estimates and abide by the limits on the Dependent Care Spending Account.

Using Time Wisely

The other cost is your time. You will need to supply information about your caregiver to your provider and then prepare and send forms for reimbursement. Your time is valuable, but in using time wisely, you can save hundreds of dollars on dependent care through this savings channel.

Documents

If I had a Dependent Care Spending Account, I would keep the following documents in this file:

1. Notice of enrollment showing the payroll contribution amount

2. Forms or instructions for filing for reimbursement

3. Correspondence from your provider including explanation of spending account and privacy policies

With these documents gathered, I would paper clip them together and place them behind our medical spending account paperwork. If you do not have this account, like me, then your file will not have this information.

I do keep some documentation about this type of account in our file because I may need it one day. If I need to return to the workplace and our children or our parents need care during the day, then we can enroll in a Dependent Care Spending Account.

Congratulations on completing another category in our insurance file housed in Box 2. You are making progress. Keep up the great work while using time wisely. Happy organizing!

Question: Do you use a Dependent Care Spending Account? If so, what would you add to this list?

Filed Under: Tax-Favored Programs, Document Organization, Box 2 Tagged With: Tax-favored programs

Fuelperks!: Saving $17 at the Gas Pump without Coupons

April 14, 2012 by Tracy

Fuelperks: Gas Promotion

Photograph Credit: fuelperks!

With gas prices rising again, I value the points I earn towards fuelperks! by shopping at Bi-Lo. The fuelperks! program allows us to  stretch our dollars as we fill up our vehicles.

Since the gas stations that accept the fuelperks! rewards tend to add a $.03 to $.05 fee per gallon for using a credit card, I choose to allow our points to build until the rewards are about to expire.

During March, I needed to use our fuelperks! before losing $.20. So, I waited until the van’s gas gauge indicator light dinged at me. Then I took our empty gas can, which we use to fill the lawn mower, and I headed to the gas station to redeem our fuelperks!.

After swiping my loyalty card and credit card, I filled the van’s gas tank and then pumped the remaining 3-4 gallons into our gas container. The total for our 20 gallons of gas came to $51.98 or $2.59 per gallon – a savings of $17! Our fuelperks! discount was $.85 off per gallon! By saving up our rewards, we continue using time wisely to stretch our dollars while filling up at the gas pump.

Click on Fuelperks!: Lowering Gas Prices at the Pump – Part 1 and Fuelperks!: Lowering Gas Prices at the Pump – Part 2 for more information on the fuelperks! program. Another helpful post is the Krazy Coupon Lady’s 5 Strategies for Saving on Gas.

As we continue to drive from place to place, consider ways you can stretch your dollars to gas up your vehicle while using time wisely. Happy savings!

Question: What gas programs are available to you?

Filed Under: Gas Prices, Stretching Your Dollars Tagged With: fuelperks

Burger King: $1 Chicken Wraps – April 14-15, 2012

April 13, 2012 by Tracy

Photograph Credit: Burger King

This weekend Burger King is offering their new crispy chicken wraps for $1 each. You can choose between honey mustard or ranch. Yum!

Participation may vary, so you may want to verify your Burger King’s participation before heading out.

In using time wisely, our family enjoys combining events during our outings. For example, after building a game show chip drop game at Lowe’s, we might stop by Burger King for a late morning snack before heading home.

These little events combined with other free activities make our family outings memorable and fun. My favorite outing to date was the green ketchup with free fries at Burger King during St. Patrick’s Day weekend. In fact, we still have a couple of packets of green ketchup remaining. 😉 Enjoy using time wisely this weekend!

Filed Under: Going Out, Inexpensive Outings, Family Activities Tagged With: Burger King

« Previous Page
Next Page »

Welcome to Using Time Wisely!


Presenting organizational tips and tricks to save you money, energy, and time.

To access 5 Ways to Using Time Wisely Today, click "like" on my facebook page and join in on the journey of Using Time Wisely.

Looking for something?

Email Newsletter

Sign up to receive email updates and to hear what's going on with us!

Copyright © 2026 · Lifestyle Pro Theme on Genesis Framework · WordPress · Log in