• Home
  • About Tracy
  • Contact Me

Using Time Wisely

Organized to save money, energy, and time

  • Email
  • Facebook
  • Pinterest
  • RSS
  • Twitter
  • YouTube
  • Document Organization
    • Overview
    • Box 1
      • Credit Report/Cards
        • Credit Reports
          • Credit Updates
          • Credit Scores
        • Credit Cards
      • Personal
      • Home Ownership
      • Vehicles
    • Box 2
      • Life Insurance
      • Major Medical
      • Tax-Favored Programs
      • Prescriptions
      • Dental & Vision
      • Special Health Policies
      • Short-term Disability
      • Long-term Disability
      • Personal Insurance
    • Box 3
      • Social Security Documents
      • Retirement
      • Investments
      • Estate Planning
      • Tax Records
  • Household
    • Cleaning
    • Maintaining
    • Organizing
    • Scheduling
      • Laundry
  • Event Planning
    • Assisting
    • Attending
    • Coordinating
      • Birthday Party
      • Christmas
      • Dinner Party
      • Fall Festival
      • Field Trip
      • Lemonade Stand
      • Thanksgiving
    • Learning
    • Preparing
    • Serving
  • Miscellaneous
    • Communication
      • Customer Service
      • E-mail
      • RSS Feed Reader
    • Goals
    • Organization
    • Time Management
      • To Do List
  • Food
    • Food Prep
    • Grocery Shopping
      • Lists
      • Pricing
    • Menu Planning
    • Recipes
    • Stockpile
  • Family Activities
    • Going Out
      • Free Outings
      • Inexpensive Outings
      • Summer
    • Rewards
      • Good Grades
      • Reading
      • Summer Reading
    • Staying at Home
  • Stretching Your Dollars
    • Daily Deals
      • Groupon
      • LivingSocial
    • Drugstores
      • CVS
    • Gas Prices
    • Gifts
    • On-line Shopping
    • Pictures
    • Products
    • Restaurants
    • School Items
    • Tips
You are here: Home / Archives for Document Organization

Kicking Off 2014 with Using Time Wisely

December 29, 2013 by Tracy

Kicking Off 2014 with Using Time WiselyIn planning for a great new year, let’s start kicking off 2014 with using time wisely before January 1st. Taking a few minutes to prepare and print off calendars and worksheets gets us ready to hit the ground running after the ball drops.

Having set my priorities and taking some time away from blogging in 2013, I am ready to jump into 2014 focused on using time wisely. Instead of staying tied to my predetermined posting scheduling, I will stick to the same topics, but I will no longer break up series.

The January 2013 series on Planning for Success, the April 2013 Birthday series, and the Summer Reading series in June 2013 brought good feedback regarding how you, my loyal readers, prefer series unbroken. I heard your feedback and have been brainstorming how to adjust. I also missed posting some great freebies because I learned of them after a Friday post and the deal went live before the next Friday’s post.

Since the posting schedule tool is no longer working for me, I am changing tools. This blogging journey has its ups and downs. For me, 2013 was a dip down as I needed to go back to the drawing board.

Though I am not sure this new change will produce the results I desire, I am willing to work through the kinks to find what works. One tool that continues to work for me is a blogging calendar as well as a personal calendar.

Review your Planning Tools

In kicking off 2014 with using time wisely, prepare your calendars. If you use apps or electronic calendars, then review those you use to determine if you want to continue with those into 2014.

Print your Planning Tools

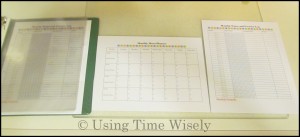
For those of you who prefer a paper version, then here are a couple of FREE printable resources for your reference:

    • FREE printable calendars (daily, weekly, and monthly)
    • FREE monthly menu planner
    • FREE water and exercise log

File your Planning Tools

As I prepared for 2014, I printed out each month for my personal calendar. I stapled all 12 months together and placed the bundle in the stackable tray by my desk. I also printed another set for my blogging schedule and filed those in my blog notebook.

The 12 menu planners and 12 water and exercise logs are stored in my kitchen notebook where I will need them at the start of each month.

With our planning tools chosen, gathered, and put in a designated place, we are ready to start. Knowing where these items are located will help us use these tools to navigate our way through 2014.

Thank you for taking this journey of using time wisely with me. I definitely don’t have all the answers, nor do I have this blogging thing figured out. I will share more of my plans for Using Time Wisely as we get 2014 underway. Finish 2013 well and prepare for 2014 while using time wisely!

Question: Are you waiting until January 1, or are you already preparing for 2014?

Filed Under: Document Organization Tagged With: New Year, menu planner, water and exercise log, calendar

2013: Third Credit Report Update

November 3, 2013 by Tracy

2013: Third Credit Report Update

Photograph Credit: Flickr (Dan Eriksson)

With an extra hour, I hope you can find a few minutes to order your next credit report.

By adding this reminder to my scheduled during the Planning for Success series, I didn’t forget our third credit report update this year.

Thanks to the SC Department of Revenue’s security breech, our family is still receiving monthly updates from our year of free monitoring.

Though I get an e-mail listing any activity, I still request a copy of our credit reports to stay on schedule and look over all the activity on our accounts.

If you are following my recommended schedule for requesting your credit reports or are just beginning, then check the date on your previous year’s credit report before requesting a new report.

Wait at least one full year from the processing of your last request for a free report to prevent incurring a fee. For example, my Equifax report printed on October 22, 2012, so I can request another this year for FREE anytime after October 23, 2013.

In using time wisely, I request our reports every 4 (or 5) months. For this third credit report update, I requested Paul’s TransUnion report and my Equifax report. When the reports arrive, I will follow this plan:

1. Review for errors,

2. Challenge discrepancies,

3. Run a FREE TransUnion credit score for Paul,

4. Replace last year’s reports with the new reports and credit score in the first file slot of Box 1 of our important documents, and

5. Put the file box away until February’s credit check.

The first time we ordered our credit reports, they were filled with errors from wrong information to incorrect credit limits. I spent months corresponding via mail and on-line forms getting the information corrected.

It took time. But in using time wisely then, I typically spend 5 minutes or less now reviewing our credit reports. The process is simple because I spent so much time getting it right the first time.

The lesson I learned from that experience was to fix errors as soon as possible. The longer you wait the more time and research it takes the company to fix it. Nipping inaccuracies early will save you frustrations later.

Keep using time wisely. Rest easy knowing your accounts are accurate by requesting your credit reports throughout the year. Finding an error early can save you money, energy, and time. Happy checking!

Question: Do you request your annual credit reports?

Filed Under: Credit Updates, Document Organization, Credit Reports, Credit Report/Cards, Box 1 Tagged With: credit report update

Open Enrollment Paperwork – Part 2 of 2

October 27, 2013 by Tracy

Open Enrollment Paperwork – Part 1 of 2Though our open enrollment selections have been made, we can still change those options until October 31. I’m thankful for the time to consider our choices as I have had to change or add benefits after meeting with our representative.

One year, we had a representative that did not add our flexible spending account information, so I had to fill out the paperwork and fax it in by the deadline. Whew!

In considering the open enrollment process, we started last week looking at a six-step system for getting through the open enrollment paperwork. The six steps are as follows:

  • Step One: Open Enrollment Types

  • Step Two: Open Enrollment Options

  • Step Three: Open Enrollment Status Quo

  • Step Four: Open Enrollment Changes

  • Step Five: Open Enrollment Plan Comparisons

  • Step Six: Open Enrollment Selections

In Part 2 of this two-part series, I will complete steps four through six which uses the information gathered in steps one through three. With the documents gathered, let’s start with step four: open enrollment changes.

Step Four: Open Enrollment Changes

With our current selections identified, I went through the insurance newsletter and noted any changes to our current selections. This let me know the new amount we would pay in premiums for the same selections next year.

Expecting an increase, I was not surprised to discover that the same coverage from 2013 will cost around $20 more a month in 2014. We are fortunate in that it only went up slightly. Others are noting a 40% increase in premium costs. Ouch!

Step Five: Open Enrollment Plan Comparisons

Each year, I take our current selections and compare them with the other available options. Thus far, we have found our current options fit our family best.

However, I still check each year because plans change as well as our family needs. This step gives me peace of mind that I have considered each option and made the best decision based on the information provided.

Step Six: Open Enrollment Selections

Knowing the best options for our family, I write out our selections and note any questions I might have. I also calculate our flexible medical spending account by listing out medical expenses I know we will incur (physicals, dental cleanings, vision exams, glasses, contacts, and at least 5 sick visits (1 for each of us)).

I am careful not to overestimate as money in this account is either use it or lose it. However, I want to guess pretty close because the money in this account gets put aside before taxes are withdrawn. Saving on taxes is always a nice touch.

With all these decisions made, Paul and I schedule a meeting with a benefits’ representative to make these open enrollment selections. The meeting usually lasts about a half hour. By the end, we have made our selections and have our questions answered.

Then we wait for open enrollment confirmation and any additional notices or documentation from the providers regarding our selections. Those notices and all open enrollment paperwork are filed within file box 2.

Of course, changes may occur. The day we had our open enrollment meeting, we received notification via mail that our prescription provider changed. This update did not affect our premiums or deductibles, but it is a change that will affect our insurance cards.

Staying on top of open enrollment issues and working through the process allows me to see the big picture and suggest the best options. Then Paul and I choose the options that best fit our budget and our family needs.

As you work through your open enrollment, I hope this process will help. Sometimes just knowing where to start can ease the overwhelming feeling associated with multiple option plans. Each employer handles open enrollment differently, so starting early will give you time to prepare. Happy selecting!

Question: In what season do you have open enrollment?  

Filed Under: Personal Insurance, Document Organization, Box 2 Tagged With: open enrollment

Open Enrollment Paperwork – Part 1 of 2

October 20, 2013 by Tracy

Open Enrollment Paperwork – Part 1 of 2

Photograph Credit: Fotolia

On the heels of getting our important documents organized, I needed to access those records for our open enrollment paperwork.

My parents worked through their open enrollment this summer with an August deadline. Our open enrollment occurs during the fall and continues through October with all changes effective on January 1, 2014.

This process can get frustrating. We dealt with issues this past year when our vision care provider decided to drop our doctor from the plan after our open enrollment period ended last year but before the effective date. Going through appeals, we finally got to see our eye doctor at the price we expected to pay.

Though you plan and prepare, you can only make decisions with the information you have. Prior to making our open enrollment selections, I went through these six steps:

  • Step One: Open Enrollment Types

  • Step Two: Open Enrollment Options

  • Step Three: Open Enrollment Status Quo

  • Step Four: Open Enrollment Changes

  • Step Five: Open Enrollment Plan Comparisons

  • Step Six: Open Enrollment Selections

In Part 1 of this two-part series, I will focus on steps one through three. Steps four through six will publish next week. Let’s begin with step one: open enrollment types.

Step One: Open Enrollment Types

Whether you have annual enrollment, open enrollment, or alternate between the two, you get to make your benefit decisions during a limited time frame. If you ignore open enrollment, then you may end up paying far more than necessary for your medical and personal services.

Our family alternates between open enrollment and annual enrollment. For open enrollment years, we can opt in and out of all our benefits, including medical, dental, vision, and insurance. During annual enrollment years, we are limited to just medical and select insurance changes.

Step Two: Open Enrollment Options

My husband’s employer prepares an insurance newsletter highlighting the options available. This year’s booklet was 12 pages and included all the increases and modifications to the plans available for our choosing.

In using time wisely to make the best decisions for our family, I read the entire booklet to get a full picture of our options. Usually I get this information about a month prior to the open enrollment deadline which gives me time to read it.

I take the booklet to the playground when my kids are playing or read snippets in car line while waiting to pickup my children from school. Choosing blocks of time that work for me, I can usually get through the booklet within a few days to a week.

Step Three: Open Enrollment Status Quo

Before figuring out which options to choose, I start with what we currently have – our status quo. Accessing our current benefits and amounts we pay, I printed a hard copy for our reference which indicated our monthly premiums.

I also chose a current pay stub showing those amounts per paycheck. Seeing the amounts by both the monthly and per paycheck methods helped us determine our financial choices for the coming year.

In using time wisely investing in understanding the open enrollment process, I have found the preparation phase gets easier each year. Being familiar with the procedures, the newsletter format, and knowing our own options helps me better evaluate our situation and needs.

Taking time to educate yourself in your insurance options and needs will give you confidence as you deal with doctor’s offices, insurance companies, and benefits’ administrators. As I appealed our vision benefits this year, I addressed the issues based on the documentation supplied and won. 🙂

If you are in the process of open enrollment, start with the information you have available through your benefits’ administrator. Read any publications provided to determine your type of enrollment and options. Then check your current selections before making any decisions.

Next week, we will look at steps four through six. Happy researching!

Question: What type of enrollment does your employer have?

Filed Under: Document Organization, Personal Insurance, Box 2 Tagged With: open enrollment

After Crossing the Finish Line

October 13, 2013 by Tracy

After Crossing the Finish Line

Photograph Credit: Microsoft Images

Like a runner who trains for the big race and puts all her efforts into finishing strong, we have been preparing our important documents file for a completed system. After crossing the finish line, we celebrate and maintain just like the runner who continues to run after the race.

Maintenance on your important document system will depend on how often you deal with these items. I usually have one or more documents to add or change within our system each month. Some additions and changes include:

  • Replacing credit bureau reports and scores
  • Paying insurance premiums
  • Checking insurance benefits
  • Filing quarterly investment statements

Besides the monthly maintenance, I try to go through our entire important document file once a year where I check each set of documents for accuracy and make sure all our information is up-to-date.

On my next big maintenance check, I need to update the address of a beneficiary. He recently moved, and I will need to make sure all the accounts where he is named have the correct address to prevent any discrepancies or delays in payment or distribution.

This process is on-going. But once the system is in place, the maintenance phase is quite simple compared to the setup and preparation phase. Just like the runner who is already in shape, the maintenance process is easier than the original training.

You ran a great race, crossed the finish line, and entered into the maintenance phase. Having just setup your file, you can take a break until you need to add or change a document within your file.

Going through your entire system may not need to occur until next year. For now, enjoy your accomplishment as you endured through a large organization process. Congratulations!

Question: How does it feel to just maintain?  

Filed Under: Box 3, Tax Records, Document Organization, Overview Tagged With: filing system

Next Page »

Welcome to Using Time Wisely!


Presenting organizational tips and tricks to save you money, energy, and time.

To access 5 Ways to Using Time Wisely Today, click "like" on my facebook page and join in on the journey of Using Time Wisely.

Looking for something?

Email Newsletter

Sign up to receive email updates and to hear what's going on with us!

Copyright © 2025 · Lifestyle Pro Theme on Genesis Framework · WordPress · Log in