• Home
  • About Tracy
  • Contact Me

Using Time Wisely

Organized to save money, energy, and time

  • Email
  • Facebook
  • Pinterest
  • RSS
  • Twitter
  • YouTube
  • Document Organization
    • Overview
    • Box 1
      • Credit Report/Cards
        • Credit Reports
          • Credit Updates
          • Credit Scores
        • Credit Cards
      • Personal
      • Home Ownership
      • Vehicles
    • Box 2
      • Life Insurance
      • Major Medical
      • Tax-Favored Programs
      • Prescriptions
      • Dental & Vision
      • Special Health Policies
      • Short-term Disability
      • Long-term Disability
      • Personal Insurance
    • Box 3
      • Social Security Documents
      • Retirement
      • Investments
      • Estate Planning
      • Tax Records
  • Household
    • Cleaning
    • Maintaining
    • Organizing
    • Scheduling
      • Laundry
  • Event Planning
    • Assisting
    • Attending
    • Coordinating
      • Birthday Party
      • Christmas
      • Dinner Party
      • Fall Festival
      • Field Trip
      • Lemonade Stand
      • Thanksgiving
    • Learning
    • Preparing
    • Serving
  • Miscellaneous
    • Communication
      • Customer Service
      • E-mail
      • RSS Feed Reader
    • Goals
    • Organization
    • Time Management
      • To Do List
  • Food
    • Food Prep
    • Grocery Shopping
      • Lists
      • Pricing
    • Menu Planning
    • Recipes
    • Stockpile
  • Family Activities
    • Going Out
      • Free Outings
      • Inexpensive Outings
      • Summer
    • Rewards
      • Good Grades
      • Reading
      • Summer Reading
    • Staying at Home
  • Stretching Your Dollars
    • Daily Deals
      • Groupon
      • LivingSocial
    • Drugstores
      • CVS
    • Gas Prices
    • Gifts
    • On-line Shopping
    • Pictures
    • Products
    • Restaurants
    • School Items
    • Tips
You are here: Home / Archives for Document Organization / Box 2

Open Enrollment Paperwork – Part 2 of 2

October 27, 2013 by Tracy

Open Enrollment Paperwork – Part 1 of 2Though our open enrollment selections have been made, we can still change those options until October 31. I’m thankful for the time to consider our choices as I have had to change or add benefits after meeting with our representative.

One year, we had a representative that did not add our flexible spending account information, so I had to fill out the paperwork and fax it in by the deadline. Whew!

In considering the open enrollment process, we started last week looking at a six-step system for getting through the open enrollment paperwork. The six steps are as follows:

  • Step One: Open Enrollment Types

  • Step Two: Open Enrollment Options

  • Step Three: Open Enrollment Status Quo

  • Step Four: Open Enrollment Changes

  • Step Five: Open Enrollment Plan Comparisons

  • Step Six: Open Enrollment Selections

In Part 2 of this two-part series, I will complete steps four through six which uses the information gathered in steps one through three. With the documents gathered, let’s start with step four: open enrollment changes.

Step Four: Open Enrollment Changes

With our current selections identified, I went through the insurance newsletter and noted any changes to our current selections. This let me know the new amount we would pay in premiums for the same selections next year.

Expecting an increase, I was not surprised to discover that the same coverage from 2013 will cost around $20 more a month in 2014. We are fortunate in that it only went up slightly. Others are noting a 40% increase in premium costs. Ouch!

Step Five: Open Enrollment Plan Comparisons

Each year, I take our current selections and compare them with the other available options. Thus far, we have found our current options fit our family best.

However, I still check each year because plans change as well as our family needs. This step gives me peace of mind that I have considered each option and made the best decision based on the information provided.

Step Six: Open Enrollment Selections

Knowing the best options for our family, I write out our selections and note any questions I might have. I also calculate our flexible medical spending account by listing out medical expenses I know we will incur (physicals, dental cleanings, vision exams, glasses, contacts, and at least 5 sick visits (1 for each of us)).

I am careful not to overestimate as money in this account is either use it or lose it. However, I want to guess pretty close because the money in this account gets put aside before taxes are withdrawn. Saving on taxes is always a nice touch.

With all these decisions made, Paul and I schedule a meeting with a benefits’ representative to make these open enrollment selections. The meeting usually lasts about a half hour. By the end, we have made our selections and have our questions answered.

Then we wait for open enrollment confirmation and any additional notices or documentation from the providers regarding our selections. Those notices and all open enrollment paperwork are filed within file box 2.

Of course, changes may occur. The day we had our open enrollment meeting, we received notification via mail that our prescription provider changed. This update did not affect our premiums or deductibles, but it is a change that will affect our insurance cards.

Staying on top of open enrollment issues and working through the process allows me to see the big picture and suggest the best options. Then Paul and I choose the options that best fit our budget and our family needs.

As you work through your open enrollment, I hope this process will help. Sometimes just knowing where to start can ease the overwhelming feeling associated with multiple option plans. Each employer handles open enrollment differently, so starting early will give you time to prepare. Happy selecting!

Question: In what season do you have open enrollment?  

Filed Under: Document Organization, Personal Insurance, Box 2 Tagged With: open enrollment

Open Enrollment Paperwork – Part 1 of 2

October 20, 2013 by Tracy

Open Enrollment Paperwork – Part 1 of 2

Photograph Credit: Fotolia

On the heels of getting our important documents organized, I needed to access those records for our open enrollment paperwork.

My parents worked through their open enrollment this summer with an August deadline. Our open enrollment occurs during the fall and continues through October with all changes effective on January 1, 2014.

This process can get frustrating. We dealt with issues this past year when our vision care provider decided to drop our doctor from the plan after our open enrollment period ended last year but before the effective date. Going through appeals, we finally got to see our eye doctor at the price we expected to pay.

Though you plan and prepare, you can only make decisions with the information you have. Prior to making our open enrollment selections, I went through these six steps:

  • Step One: Open Enrollment Types

  • Step Two: Open Enrollment Options

  • Step Three: Open Enrollment Status Quo

  • Step Four: Open Enrollment Changes

  • Step Five: Open Enrollment Plan Comparisons

  • Step Six: Open Enrollment Selections

In Part 1 of this two-part series, I will focus on steps one through three. Steps four through six will publish next week. Let’s begin with step one: open enrollment types.

Step One: Open Enrollment Types

Whether you have annual enrollment, open enrollment, or alternate between the two, you get to make your benefit decisions during a limited time frame. If you ignore open enrollment, then you may end up paying far more than necessary for your medical and personal services.

Our family alternates between open enrollment and annual enrollment. For open enrollment years, we can opt in and out of all our benefits, including medical, dental, vision, and insurance. During annual enrollment years, we are limited to just medical and select insurance changes.

Step Two: Open Enrollment Options

My husband’s employer prepares an insurance newsletter highlighting the options available. This year’s booklet was 12 pages and included all the increases and modifications to the plans available for our choosing.

In using time wisely to make the best decisions for our family, I read the entire booklet to get a full picture of our options. Usually I get this information about a month prior to the open enrollment deadline which gives me time to read it.

I take the booklet to the playground when my kids are playing or read snippets in car line while waiting to pickup my children from school. Choosing blocks of time that work for me, I can usually get through the booklet within a few days to a week.

Step Three: Open Enrollment Status Quo

Before figuring out which options to choose, I start with what we currently have – our status quo. Accessing our current benefits and amounts we pay, I printed a hard copy for our reference which indicated our monthly premiums.

I also chose a current pay stub showing those amounts per paycheck. Seeing the amounts by both the monthly and per paycheck methods helped us determine our financial choices for the coming year.

In using time wisely investing in understanding the open enrollment process, I have found the preparation phase gets easier each year. Being familiar with the procedures, the newsletter format, and knowing our own options helps me better evaluate our situation and needs.

Taking time to educate yourself in your insurance options and needs will give you confidence as you deal with doctor’s offices, insurance companies, and benefits’ administrators. As I appealed our vision benefits this year, I addressed the issues based on the documentation supplied and won. 🙂

If you are in the process of open enrollment, start with the information you have available through your benefits’ administrator. Read any publications provided to determine your type of enrollment and options. Then check your current selections before making any decisions.

Next week, we will look at steps four through six. Happy researching!

Question: What type of enrollment does your employer have?

Filed Under: Document Organization, Personal Insurance, Box 2 Tagged With: open enrollment

Planning for Success: Prepare Your Medical Spending Record – Day 20

January 20, 2013 by Tracy

Planning for success - Day 209

Photograph Credit: iStockphoto

Knowing that a successful year will not materialize on its own, we must plan and prepare for a prosperous 2013.

Throughout the 31 days of January, I will choose one topic each day to prepare or schedule for this year.

Without preparation, I know I will forget, miss, or overlook certain items. If you desire an organized year, then join me in this adventure of Planning for Success for a prosperous 2013.

To receive a daily e-mail around 11:00 a.m. with the new posts of each day, subscribe to my free daily newsletter. In case you miss a post in this series, I will provide the link to each day as the month progresses. 🙂

  • Day 1: Select a Planning Tool
  • Day 2: Add Your Priorities
  • Day 3: Print and Display Your Menu Planner – with free printable
  • Day 4: Record Membership Expiration Dates 
  • Day 5: Mark Due Dates for Monthly Bills
  • Day 6: Insert Credit Report Schedule
  • Day 7: Schedule Your Annual Home Maintenance
  • Day 8: Set Your School and Work Activities
  • Day 9: Highlight Contract and Subscription Expiration Dates
  • Day 10: Download a Savings Tracker
  • Day 11: Note Daily Deals Expiration Dates
  • Day 12: Setup Bill Pay
  • Day 13: Secure Doctor Appointments
  • Day 14: Purchase Batteries
  • Day 15: Include Holidays
  • Day 16: Jot down Library Return Dates
  • Day 17: Track Your Family’s Favorite Meals
  • Day 18: Reserve Time for Your Priorities
  • Day 19: Post Your Payday Schedule – with free printable

Day 20: Prepare Your Medical Spending Record

Keeping the paperwork under control is an ongoing battle. Between the mail and on-line statements, the documenting and checking this information continues.

One set of documents that comes monthly is our medical spending statement. Having explained in detail the benefits of a medical spending account or a health savings account, I advised Paul to enroll again for 2013 which he did. 🙂

Having determined approximately how much we plan to spend in medical expenses for 2013 at our open enrollment session, we signed up and received confirmation of the changes from 2012. Taking that information and verifying against our request, I recorded the information on my Medical Spending Record.

Free Printable

Portrait Options

  2013 Medical Spending Record (.pdf version)

2013 Medical Spending Record (Microsoft Word version)

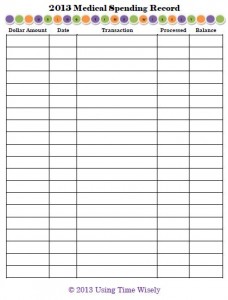
2013 Medical Spending Record portrait

Landscape Options

 2013 Medical Spending Record (.pdf version)

2013 Medical Spending Record (Microsoft Word version)

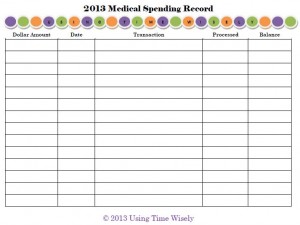
2013 Medical Spending Record

You are welcome to download, customize the Microsoft Word version, and use this free printable. To share this resource with others, please forward the link to this post rather than sending the file directly.

Thank you for protecting Using Time Wisely’s copyright.

With 5 columns, I record the dollar amount, date, transaction, date processed, and balance.

1. Dollar amount: The amount spent or deposited.

2. Date: The date of service.

3. Transaction: Description of payment (e.g., Tracy’s doctor’s visit, Paul’s prescription, Tracy’s contacts, etc.).

4. Date Processed: The date the transaction cleared your account.

5. Balance: Total amount left to spend for 2013.

By recording our medical payments to our Medical Spending Record, I can quickly verify the information when the statements arrive and know our balance left to spend.

For those of you using a Health Savings Account (HSA), your financial institution should provide a saving register for your information. With your HSA, you will have deposits, withdraws, and dividends. As you prepare for 2013, keep your account balanced.

In planning for success, prepare your medical spending record. I have used the Medical Spending Record for a number of years. The simple spreadsheet tracks our expenses and payments, so I am sure to use all these funds for our medical expenses this year.

As you scrimp and save this year, follow your Medical Spending Record to prevent unused medical funds at the end of 2013. Remember, you will lose what you do not spend in this account. The advantage is using pre-taxed dollars for your medical care.

When not in use, file your Medical Spending Record within your insurance file under category Tax-favored Programs. Happy organizing!

Question: How do you prepare for your family’s 2013 medical expenses?

Filed Under: Tax-Favored Programs, Planning for Success, Document Organization, Box 2, Uncategorized Tagged With: Planning for success

Additional Items in Box 2 of our Important Documents

July 15, 2012 by Tracy

Insurance File - Box 2 of Important DocumentsIn completing file Box 2, I mentioned in last week’s post that I had a few extra documents tucked into the last pocket of my filing system.

The first and last pockets in my accordion file do not have a label holder, so I usually skip those slots when filing items.

However, the openings can hold items if needed, so I chose to place a few uncategorized documents in the last pocket for safe keeping.

Employer’s Bankruptcy Court Documents

After leaving being laid off from his previous employer (2006), my husband, Paul, began receiving legal notices of that company’s bankruptcy proceedings.

Though he was no longer an employee, Paul got these notices seeking to find all the company’s debts. As a previous employee, Paul got these notice. Even though the company fulfilled all its payments to us, we continued to receive the correspondence.

Since these notices did not pertain to any of our accounts or policies, I needed to assign a place to file this paperwork. With the last file opening of Box 2 empty, I filed the documents in this slot near other paperwork from that employer.

Though the last correspondence was in 2010, I still keep the documents in the event the case enters the appeals process. By assigning a place for these documents, I know where to find them and can add more items if necessary.

This concludes the documents in Box 2 of my important documents. As you organize your paperwork and assign spaces for your documents, I hope this sample of my filing system points you in the right direction.

Our situations are different and thus our documents and policies will differ. However, knowing what items you have and assigning a space for each category is the key to organizing your paperwork. This journey is a marathon, and we are two-thirds of the way to the finish line. Keep going!

Question: What odd documents do you have in your stash that do not fit within the “normal” categories? 

Filed Under: Document Organization, Box 2 Tagged With: documents

Long-Term Disability Insurance

July 8, 2012 by Tracy

Insurance File - Box 2 of Important DocumentsToday is monumental – the last category in Box 2 of our important documents! Though these last two categories (short-term and long-term disability) only hold a few documents, I keep them separate due to different types of policies. Also, should claims get filed, I need space to keep all the documentation for proof of submission.

Kept within the eleventh file opening are the documents for our long-term disability insurance which makes up our ninth and last category in our insurance filing system. 🙂

Long-Term Disability Insurance

Defined

Similar to our short-term disability, our long-term disability insurance policies protect Paul’s paycheck should he become disabled. Paul’s employer offers a basic long-term disability policy free of charge to all active employees. This benefit has basic coverage, but we choose to pay for supplemental long-term disability which provides at least 65% of Paul’s covered pre-disability earnings.

Our long-term disability policies work together and begin on day 90 of Paul’s disability. Should Paul become disabled, our family would receive compensation beginning on day 7 with short-term disability and then transfer to long-term disability on day 91.

Documents

For these policies, I keep the following documents in this eleventh file opening of our insurance file box:

Summary Page

This one-page document has the administrator’s contact information and instructions for filing claims.

Policies

From the employer’s web site, I downloaded (and still need to print out) these two policies. I do keep a record of these links in this file opening.

Instructions

Since Paul’s employer holds these policies, we do not have personal policy numbers. If we need to file a claim, Paul’s benefits’ office has specific instructions and deadlines for submitting documentation. I have included these instructions to make finding the information quick.

All these documents make up the ninth category of our insurance documents. Remember your file will hold your documents which may or may not include all these items.

If you have a long-term disability policy, then gather those documents and place them in this file opening. If you don’t have this policy and hope to have one in the future, then create a label and leave an empty space in your file.

All the categories are now complete. Yeah!

However, I have other documents in the last section of this file. My accordion file offers a front and back opening without a slot for a label. Usually I keep these pockets empty, but we had some unusual documents. I will share that information with you next week. In the meantime, keep up the good work, and happy organizing!

Question: How is your document organization coming along?

Filed Under: Long-term Disability, Document Organization, Box 2 Tagged With: insurance

Next Page »

Welcome to Using Time Wisely!


Presenting organizational tips and tricks to save you money, energy, and time.

To access 5 Ways to Using Time Wisely Today, click "like" on my facebook page and join in on the journey of Using Time Wisely.

Looking for something?

Email Newsletter

Sign up to receive email updates and to hear what's going on with us!

Copyright © 2025 · Lifestyle Pro Theme on Genesis Framework · WordPress · Log in