• Home
  • About Tracy
  • Contact Me

Using Time Wisely

Organized to save money, energy, and time

  • Email
  • Facebook
  • Pinterest
  • RSS
  • Twitter
  • YouTube
  • Document Organization
    • Overview
    • Box 1
      • Credit Report/Cards
        • Credit Reports
          • Credit Updates
          • Credit Scores
        • Credit Cards
      • Personal
      • Home Ownership
      • Vehicles
    • Box 2
      • Life Insurance
      • Major Medical
      • Tax-Favored Programs
      • Prescriptions
      • Dental & Vision
      • Special Health Policies
      • Short-term Disability
      • Long-term Disability
      • Personal Insurance
    • Box 3
      • Social Security Documents
      • Retirement
      • Investments
      • Estate Planning
      • Tax Records
  • Household
    • Cleaning
    • Maintaining
    • Organizing
    • Scheduling
      • Laundry
  • Event Planning
    • Assisting
    • Attending
    • Coordinating
      • Birthday Party
      • Christmas
      • Dinner Party
      • Fall Festival
      • Field Trip
      • Lemonade Stand
      • Thanksgiving
    • Learning
    • Preparing
    • Serving
  • Miscellaneous
    • Communication
      • Customer Service
      • E-mail
      • RSS Feed Reader
    • Goals
    • Organization
    • Time Management
      • To Do List
  • Food
    • Food Prep
    • Grocery Shopping
      • Lists
      • Pricing
    • Menu Planning
    • Recipes
    • Stockpile
  • Family Activities
    • Going Out
      • Free Outings
      • Inexpensive Outings
      • Summer
    • Rewards
      • Good Grades
      • Reading
      • Summer Reading
    • Staying at Home
  • Stretching Your Dollars
    • Daily Deals
      • Groupon
      • LivingSocial
    • Drugstores
      • CVS
    • Gas Prices
    • Gifts
    • On-line Shopping
    • Pictures
    • Products
    • Restaurants
    • School Items
    • Tips
You are here: Home / Archives for Food / Grocery Shopping

Evaluating: Taking a Step Back – Part 1 of 3

January 26, 2012 by Tracy

Photograph Credit: Flickr (Cyberhawk Innovations)

When the hustle and bustle of grocery shopping has ceased and in the calm of my household (in theory), I evaluate by taking a step back to review, learn, and strategize.

Just taking 5 minutes to note the great deals, the bypassed deals, and the did-I-really-need-that deals, I learn more about how I shop and how to improve on my next shopping adventure.

To help improve my grocery shopping savings, I review the grocery list, where I jotted down ideas and made notes.

Reviewing your Grocery List

After putting away all the groceries and cleaning up the kitchen, I take a moment to check the grocery list. In looking over the list, ask these questions:

1. Did you jot down any menu planning ideas?

If so, add those ideas to your menu. With my menu planner on the refrigerator, I turn from my counter to the refrigerator and write the ideas on the schedule.

2. Did you get everything on your list?

If yes, are you pleased with this shopping trip? If not, why not? (Answers will vary.) How can you improve?

If not, why did you choose to bypass the deal?

If not, due to out-of-stock items, did you get a rain check? Was the rain check written correctly? Does the rain check expire? If so, place it near the front of your store envelope to use on your next trip.

3. Did you buy more items than you planned?

Did you need those items, or was it an impulse buy? If an impulse purchase, were you hungry? Influenced by your children?

Using these questions while reviewing your shopping list can pinpoint areas where you excel while revealing your tendencies. By taking a step back and reviewing my shopping trips, I learn what I did right, what I bombed, and how I can improve.

As you seek to see the deep savings each week, learning how to decide a good deal from a great deal will get you on your way. Just take it slowly and take a step back to learn from each shopping trip. In using time wisely, spending 5 minutes to check your progress is worth seeing those deep savings as you improve. Happy savings!

Question: How often do you buy only what is on your shopping list? Please add your answer to the comments.

Filed Under: Grocery Shopping, Food Tagged With: grocery shopping

Evaluating: Taking a Step Back – Overview

January 19, 2012 by Tracy

Photograph Credit: Flickr (Caston Corporate)

After spending the day snuggling with my ill children, washing bedding, and cleaning up accidents without feeling frustrated, I ventured out to the grocery stores since it was the last day of the sale. I had planned to shop in the morning after taking my son to school, but . . . life happened. 🙂

With limited time, I made out my grocery list and grabbed those coupons in about 20 minutes. When I realized how quickly the plan came together, I reaffirmed the benefits of this process for me.

I remember a time in the not-too-distant past when this same process took me an hour. Back then, I was thinking:

  • Maybe I should spend my time doing something more constructive
  • Maybe I should forget the coupons
  • Maybe I should just shop at Aldi and forget these other stores

What I should have thought was:

  • Look what I am learning by methodically planning my savings
  • See the deep savings I am getting to feed my family
  • Wonder how I can increase my productivity with this system

By repeating this process each month, I am continuing to see deep savings while using time wisely. Spending 20 minutes to save $30 is worth those precious minutes. Thankful now that I created a plan, executed that plan, and repeated the plan for almost a year because I am reaping the benefits.

This process has worked for me. Try it. It may work for you as well.

My Menu Planning Process

  • Step One: Choosing a menu plan.
  • Step Two: Adding meals to your plan from the food you have on hand.
  • Step Three: Continuing to add meals.

My Grocery Shopping Process

  • Step Four: Creating grocery lists.
    • Part 1: Identify needed items.
    • Part 2: Select sale items.
    • Part 3: Compile a list for each store.
  • Step Five:  Gathering your savings.
    • Part 1: Entering the store.
    • Part 2: Shopping your list.
    • Part 3: Checking out.
  • Step Six: Giving your groceries a home.
    • Part 1: Unloading your savings.
    • Part 2: Organizing your savings.
    • Part 3: Preparing for future savings.

My Evaluation Process

  • Step Seven: Taking a Step Back.
    • Part 1: Reviewing your grocery list.
    • Part 2: Reviewing your grocery envelopes.
    • Part 3: Reviewing your receipts.

Next week, I will begin this last step in the process – Evaluating: Taking a Step Back. This section helps me learn from my mistakes, update my rock bottom pricing list, delight in my savings, and reset for another great week. Happy savings!

Question: What have you found helpful in this series? Please add your answer to the comments.

Filed Under: Grocery Shopping, Food Tagged With: grocery shopping

Grocery Shopping: Giving Groceries a Home – Part 3 of 3

January 12, 2012 by Tracy

Photograph Credit: Flickr (Emily Connell)

This past week was a slim grocery shopping week for our family. Factoring in my messy coupon binders with the slower sales this week, I opted to grab Fabuloso, yogurt, and tea bags on my way home Tuesday night.

Other than hamburger buns, strawberries, and milk picked up from Aldi earlier this week, my grocery shopping has been minimal.

Even with a small grocery shopping trip, I still follow the same process to continue using time wisely.

In the Giving Your Groceries a Home series, we have unloaded our savings, organized our cold items, and organized our grocery items.

After putting away the groceries, I have reusable bags, plastic bags, and boxes cluttering my kitchen as well as debris on the counters from the packaging materials and any cleaners or hygiene items. With the food items in their designated locations, I focus on preparing for future savings.

Preparing for Future Savings

1. Put away the grocery holders. I use the word “holders” to include bags and boxes. By the end of this process, the bags are on the floor and the counters. If they have not been used as train cars, then the boxes are also on the floor. 🙂

    • Reusable bags. I fold them up and place them on top of my diaper bag.
    • Plastic bags. Gathering these bags together, I place them in an oblong sleeve that my mom made especially for me. My sunflower-patterned sleeve is kept inside my pantry door and clipped to my upper spice rack.
    • Boxes. When my children finish playing with the boxes, I stack them together by the garage door.

On my next trip out to the garage, I take my boxes to the recycling container and the reusable bags to the trunk of my vehicle.

2. Remove items from counters. Taking the remaining items from the shopping trip, I divide them into the upstairs and the downstairs placement.

    • Downstairs Placement. At this time, I will leave the kitchen to put these items away.
    • Upstairs Placement. The products that belong upstairs, I add to the “to go upstairs” pile of items.

3. Wipe counters. With the counters clear, I take a clean cloth or sponge and wipe down my kitchen counters. When I enter my kitchen to prepare the next meal, I will start with clean counters.

Though this organizational system works for me, it may or may not work at your home. Using a system continues to save me money, energy, and time while using time wisely.

Consider your process. Does it work? If so, then continue. If not, try another option. You might be surprised to find one trick (not leaving the room until all is cleaned and organized) that maximizes your time and prevents distractions. Happy organizing!

Question: What do you do with your plastic grocery bags? Please add your answer to the comments.

Filed Under: Grocery Shopping, Food Tagged With: organzing, grocery shopping

Grocery Shopping: Giving Groceries a Home – Part 2b of 3

January 5, 2012 by Tracy

With entertaining company, accumulating new items, and visiting friends and family, my house (except for my dining room) needs attention. My progress is slow, but I’m gaining momentum. On the agenda today is grocery shopping.

As I scrape together meals on what we have on-hand (or borrow from my fabulous neighbor :-)), I value the buying ahead principle. Keeping my refrigerator, freezer, and pantry well-stocked with merchandise purchased at rock bottom prices stretches our budget, especially when life gets busy.

At the beginning of December 2011, I introduced step six: giving your groceries a home. In part 1, I shared how I unload my savings upon returning from the grocery store. The next week in part 2a, the cold items were given a home on designated shelves and sections of my refrigerator and freezer. Today, I will continue with the series on organizing my pantry with the remaining deals from grocery shopping.

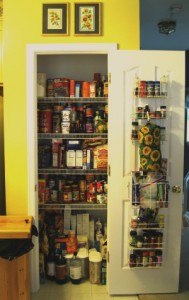
Pantry

Finding an organizational system that works for you may take some time. I share with you my system that has evolved over the years. Since I am shorter (5’4”), I place most of the items on shelf #2 and lower. The top shelf houses items I use infrequently since I have more difficulty reaching those items. With that said, I still use the shelf, I just ask my tall (6’2”), handsome hubby to use his strong muscles to help this damsel in distress with her 5 lb. bag of flour. 🙂

Tracy’s Pantry Organization:

Shelf #1 (top shelf) – flour, confectioner’s sugar, brown sugar, cake mixes, brownie mixes, and spices

Most of my spices stay on two racks on the inside door of my pantry. The spices on the top shelf are rarely used or the containers are too big to fit in my rack.

Shelf #2 – condiments, dry oatmeal, bread crumbs, pudding, and jello

Shelf #3 – pasta, rice, sides, popcorn, crackers, and a basket with baking ingredients (chocolate chips, marshmallows, etc.)

Shelf #4 – canned goods and instant beverage mixes (tea bags, hot cocoa, lemonade, etc.)

Floor of pantry – bottled beverages, chips, cereals (boxed and instant – oatmeal, grits), sugar, and snacks

By designating the type of items for each shelf, I can easily find the ingredients I need. Sometimes one shelf will get overloaded from a great sale, and I will “borrow” space from another shelf until space becomes available.

I also keep a box out in my garage for overflowing items, like the extra 6 bags of 4 lb. sugar packages I purchased for $.71 (shared this deal on Facebook on November 24).

Tracy’s Tips:

1. Keeping snacks and cereal at the bottom allows little ones to help at meal time.

2. Can goods dropped from any height could crack or damage your floor. Though I have not had this happen to my floor, I have had my toes crushed. Ouch!

3. Keeping like items together aids in making your grocery list as you scan your available resources

4. Add newly purchased items to the back and bring previous purchased items to the front. Keeping the items rotated will help prevent purging expired items.

5. When an arrangement is not working, fix it. The longer it bothers you, the more time you waste.

6. Teach your little ones your organizational system. They LOVE being big helpers (most of the time).

By the time my pantry items are on assigned shelves, my groceries have all been given a home. In using time wisely, I usually reorganize my pantry at least twice a year. Anytime the shelves get a little thin, I use that opportunity to reorganize before restocking.

As you find an organizational system that works for you, putting your groceries away and retrieving them will take little time. Keep plugging away while using time wisely, and happy organizing!

Question: How do you organize your pantry? Please add your answer to the comments.

Filed Under: Grocery Shopping, Food Tagged With: grocery shopping

Grocery Shopping: Giving Groceries a Home – Part 2a of 3

December 15, 2011 by Tracy

Photograph Credit: Flickr (Bosch Appliances)

Even after eating a cookie while grocery shopping, my children are usually STARVING by the time we walk into the house. Not sure if it is all the food they see, or just the time of day. Whatever it is, they are hungry.

Upon sending them to the pantry for nourishment (ahem) or junk food, I concentrate on the counter full of groceries that I just unloaded. Before giving my pantry items a home (which will be covered in Part 2b), I turn my attention to the cold items which will be placed in the refrigerator or freezer.

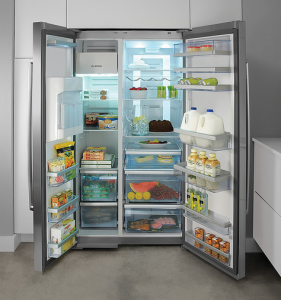
Organizing the Refrigerator

Each shelf or drawer in my refrigerator holds certain items. By keeping the same system, I can quickly put items away and retrieve them while preparing meals and snacks. Though there are exceptions to these guideline when hosting parties, holidays, and other events, my refrigerator contains the following items on each shelf or in each drawer:

    • Shelf #1 – beverages
    • Shelf #2 – butter, eggs, bread, and sourdough starter
    • Drawer #1 – cold cuts and bread dough
    • Shelf #3 – yogurt, sour cream, and cream cheese
    • Shelf #4 – leftovers
    • Drawer #2 – fruits (apples, oranges), vegetables (potatoes, carrots), and spice (garlic)
    • Drawer #3 – all cheeses

As I put the cold items away, I will stack new items on the bottom or in the back of existing products. By doing so, the older item gets used prior to the new container being opened. Though this is the goal, I currently have two opened jars of apple sauce on the fourth shelf in my refrigerator. 🙂

Organizing the Freezer

If I will be using the frozen item in the next week, then I place it in the freezer side of my side-by-side refrigerator in the house. All the other frozen items are place in our chest freezer housed in the garage. Again, having an organized system helps the “putting away” to go quickly. I have our chest freezer organized as follows:

Left side

    • Packaged meats (ham, turkey, bacon, chicken, hot dogs, sausage)
    • Boxed meals

Center basket

    • Hamburger
    • Roasts
    • Steaks

Center bottom

    • Pizzas
    • Breads
    • Desserts
    • Double batch cooking (For some meals, I make multiple portions to save for busy nights.)

Right side

    • Vegetables
    • Pork chops
    • Breakfast foods

When I put these items away, I place the newer items on the bottom or in back of other existing product. Any meats that need to be cut up or packaged together (i.e., chicken, pork chops, etc.), I put in the refrigerator until after all the groceries are put away. Then during meal preparations, I will divide up the hamburger, pork chops, etc., wrap, and place them in the chest freezer.

With all the cold items placed in the refrigerator or freezer, I can then concentrate on meeting my children’s needs. After addressing their starving situation and refilling their drinks, I then continue giving the other groceries a home which will be covered next week. In using time wisely, I have a designated spot for each type of item. This system works for me. Hope it works for you as well. Happy organizing!

Question: Do you designate shelves and drawers for specific items in your refrigerator and freezer? Please add your answer to the comments.

Filed Under: Grocery Shopping, Food Tagged With: food, grocery shopping

« Previous Page
Next Page »

Welcome to Using Time Wisely!


Presenting organizational tips and tricks to save you money, energy, and time.

To access 5 Ways to Using Time Wisely Today, click "like" on my facebook page and join in on the journey of Using Time Wisely.

Looking for something?

Email Newsletter

Sign up to receive email updates and to hear what's going on with us!

Copyright © 2025 · Lifestyle Pro Theme on Genesis Framework · WordPress · Log in