• Home
  • About Tracy
  • Contact Me

Using Time Wisely

Organized to save money, energy, and time

  • Email
  • Facebook
  • Pinterest
  • RSS
  • Twitter
  • YouTube
  • Document Organization
    • Overview
    • Box 1
      • Credit Report/Cards
        • Credit Reports
          • Credit Updates
          • Credit Scores
        • Credit Cards
      • Personal
      • Home Ownership
      • Vehicles
    • Box 2
      • Life Insurance
      • Major Medical
      • Tax-Favored Programs
      • Prescriptions
      • Dental & Vision
      • Special Health Policies
      • Short-term Disability
      • Long-term Disability
      • Personal Insurance
    • Box 3
      • Social Security Documents
      • Retirement
      • Investments
      • Estate Planning
      • Tax Records
  • Household
    • Cleaning
    • Maintaining
    • Organizing
    • Scheduling
      • Laundry
  • Event Planning
    • Assisting
    • Attending
    • Coordinating
      • Birthday Party
      • Christmas
      • Dinner Party
      • Fall Festival
      • Field Trip
      • Lemonade Stand
      • Thanksgiving
    • Learning
    • Preparing
    • Serving
  • Miscellaneous
    • Communication
      • Customer Service
      • E-mail
      • RSS Feed Reader
    • Goals
    • Organization
    • Time Management
      • To Do List
  • Food
    • Food Prep
    • Grocery Shopping
      • Lists
      • Pricing
    • Menu Planning
    • Recipes
    • Stockpile
  • Family Activities
    • Going Out
      • Free Outings
      • Inexpensive Outings
      • Summer
    • Rewards
      • Good Grades
      • Reading
      • Summer Reading
    • Staying at Home
  • Stretching Your Dollars
    • Daily Deals
      • Groupon
      • LivingSocial
    • Drugstores
      • CVS
    • Gas Prices
    • Gifts
    • On-line Shopping
    • Pictures
    • Products
    • Restaurants
    • School Items
    • Tips
You are here: Home / Archives for Food / Stockpile

How to Soften a Bag of Hard Sugar

January 23, 2014 by Tracy

How to Soften a Bag of Hard Sugar

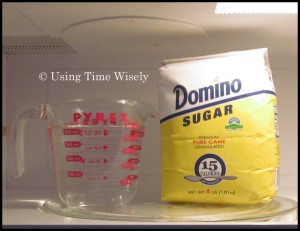
How to Soften a Bag of Hard SugarMy stockpile currently holds 6 bags of sugar – in addition to other types of baking supplies and food. As I store my stockpile in our garage, the bags of sugar get hard.

Finding that adding moisture to the air in our microwave makes cleaning easy, I decided to try adding the bag of sugar within that same atmosphere.

If I were a student, then this experiment would probably be my science fair project.

Instead of How to Soften a Bag of Hard Sugar, my hypothesis would be Adding Moisture in the Air will Soften a Bag of Hard Sugar. Since my experiment worked, I am glad to report the results.

How to Soften a Bag of Hard Sugar

1. Fill a glass measuring cup with 2 cups of water.

2. Heat the water in the microwave for 5 minutes.

3. Let rest for 2 minutes as the steam fills the microwave’s interior.

4. Open the bag of sugar from the top.

5. Quickly open the microwave door and insert the opened bag of sugar.

6. Close the microwave door.

7. Heat the sugar and water for 1 minute.

8. Let rest for 1-2 minutes as the steam softens the sugar.

9. Remove the bag of sugar and feel the softness by squeezing the bag.

10. If the bag is still hard, repeat steps 7-9.

More than Just a Bag of Sugar

In addition to bags of sugar and brown sugar, this method also works to soften bread. We add moisture to our microwave before heating leftover pizza, breadsticks, corn bread, and biscuits. With the added moisture, the bread perks up and is soft to eat.

Though no science fair projects are on our horizon, I still enjoy experimenting to finding solutions to issues around our home. Solving the dilemma of how to soften a bag of hard sugar frees me from worrying about the sugar getting hard in the garage.

Without worry, I am better able to use time wisely keeping up with other tasks, like laundry. 😉 Happy experimenting!

Question: What experiments have you tried?

Filed Under: Food, Stockpile Tagged With: tips, kitchen

Start Saving from Scratch – Part 5 of 6

November 29, 2012 by Tracy

Start Saving from Scratch

Photograph Credit: Microsoft Images

Stocked up on crackers, Sprite, and noodle soup this past week.

Thinking that these supplies are good for a distant rainy day, I barely tucked them away before Paul and the girls needed them.

Just thankful we did not need to make an emergency run to the grocery store and pay full price. 😉

In start saving from scratch, I had interrupted my routine, so I hit the reset button. I organized my food supply (Part 1), created a menu (Part 2), compiled a grocery list (Part 3), and gathered my savings (Part 4). With all the groceries purchased, I’m ready to give those groceries a home.

Part 5: Giving Groceries a Home

In accepting help from my children, we unload the van. Now that my children are a bit older, they help carry lightweight items. My son can take the milk into house which is a big help.

Unload Groceries

Once in the house, I unload the groceries onto my kitchen counters. This way, I can see all the items before putting 3 items away only to find a fourth one tucked in another bag.

Put Away Cold Foods

I then organize my refrigerator and freezer putting the new items behind the existing items. This way, I am using my stockpile in the order it was purchased. Otherwise, the older items get stuffed in the back and spoil before use.

Store Grocery Items

With all the cold items put away, I then concentrate on the dry items. As I adjust my pantry’s contents, I make room for the new items. I continue placing the new items purchased behind any existing products. For example, a new bottle of salad dressing is placed behind the Italian and Ranch dressing currently in the pantry.

Prepare for Next Visit

Though all my items are put away, I’m not done cleaning up and preparing for my next visit. To do so, I return all the reusable bags to the car, remove remaining items (i.e., toothpaste, cleaners, medication, etc.), and wipe down the kitchen counters.

As I prepared and choose the savings for my family, I take care to put the items away for easy accessibility at meal time. In start savings from scratch, I have almost completed the process. In next week’s post, I will complete this series with my evaluation process. Keep on saving while using time wisely. Happy organizing!

Question: How often do you organize your food supply areas?

Filed Under: Food, Stockpile Tagged With: food, grocery, savings

Start Saving from Scratch – Part 2 of 6

November 8, 2012 by Tracy

Start Saving from Scratch

Photograph Credit: Microsoft Images

Going back to the drawing board provides a fresh start saving from scratch. Beginning with the basics and then working up allows the process to stay manageable. When the foundation crumbles, then one needs to start over.

In starting over, I took last week’s challenge and organized my food supply. This time around, the pantry took longer although I did not defrost my freezer. I stayed inside as much as possible this week with the drop in temperature.

In continuing this series with an organized pantry, freezer, and refrigerator, I move onto creating a menu.

Part 2: Creating a Menu

In discovering a menu plan, I have used a weekly and monthly plan. Though I no longer plan the full month in advance, I prefer to schedule our meals a week in advance on a monthly menu planner. I like the calendar in the kitchen and a place to add meals as I get inspiration.

1. Choose Meals

With my pantry, freezer, and refrigerator organized, I can “shop” from my food supply to create meals that I have in stock.

2. Assign Meals

Once I have a meal decided, I assign that meal to a day on my menu planner.

Sample Menu Plan

Sunday: 

B – Egg sandwiches with fruit cups

L – Roast beef in crock pot, mashed potatoes, vegetables, and bread

D – Pancakes and bacon

Monday:

B – Cereal and fruit

L – Pizza at school

D – Baked chicken, rice, and vegetables

3. Partial Meals

After assigning the meals I can make with the ingredients at home, I might have a few days left on my planner for the week. I continue to see what parts of meals I have in my food supply. For example, to make open-faced pork chop sandwiches I might have the pork chops, cream of chicken, and milk, but I lack the hamburger buns.

For these partial meals, I add the meal to my menu planner on a day after I plan to grocery shop. I then add the remaining items needed, in this case the hamburger buns, to my weekly grocery list. I then plan hamburgers or chicken patties for another meal to use the leftover hamburger buns before they spoil.

In using time wisely to prepare for the week and to save money on food items, I use what we have at home and then write down the missing items on my grocery list for pickup during the week.

Shopping your food supply may only generate a meal or two, at first. But as you build your stockpile, you will find more and more meals in your food supply. Start where you are and work from there, and the savings will come. Happy menu planning!

Question: What type of menu planner do you prefer?

Filed Under: Menu Planning, Stockpile, Food Tagged With: stockpile, menu planning, saving from scratch, food

Stockpile: Pasta and Vegetables

April 14, 2011 by Tracy

The term “stockpile” refers to items that have been purchased at rock bottom prices prior to needing the item. Some people use their garage, pantry, and linen closets to house their stockpile. I have a few places where my stockpile resides: pantry, outside freezer, garage, under the sink in the Master bathroom, and the Master bathroom linen closet. I keep food in the pantry, outside freezer, and the garage; and I place the toiletry and personal items under the sinks and in the linen closet of my Master bathroom. When I arrive home from shopping, I have a designated place to put my free to really inexpensive items that we will be using in the future.

When I find a great deal on items we need, I buy ahead and place those items in one of the locations of my stockpile. For example, on Monday I shopped at Publix. (These sales prices ended on Tuesday and are no longer available. This breakdown is an example of using the sales to add to my stockpile.)

Here’s what I purchased:

4 boxes of Mueller’s Pasta – on sale buy one get one free or $.69 each. I used 2 coupons for $1 off 2 boxes which made them $.19 each. I consider $.25 or less a rock bottom price for pasta.

1 bottle Ken’s Steak House marinade (16 oz.) – on sale buy one get one free or $1.49 each. I used $1 off coupon from newspaper which brought the cost to $.49. With grilling season around the corner, this teriyaki marinade on chicken is a family favorite. My rock bottom price for marinades is $.75 or less. If I had had more coupons, I would have purchase more.

6 bags of Green Giant Valley Fresh Steamers – on sale buy one get one free or $1.19 each. I used 2 coupons for $1 off 2 bags which made 4 of the bags $.69 each. I also used 2 coupons for $.50 off one bag. Since this coupon doubled, I was able to get 2 bags for $.19 each. My goal is to purchase frozen vegetables for less than $1 per bag. This sale pairs with the coupons reached my rock bottom price.

2 containers of Friendship Sour Cream – on sale for $1.25 each. I used 2 coupons for $.55 each off which doubled. My final cost was $.70 each. My rock bottom price is $.99 for sour cream.

My total for these 13 items came to $5.57. I saved $20.69 with sales and coupons which was a savings of 79%. After celebrating my savings, I placed the pasta and marinade in my pantry, the sour cream in the refrigerator, and the frozen vegetables in my outside freezer. As I plan my menu, I now have an assortment of pasta and vegetables from which to choose as I feed my family.

Unlike some, my stockpile will not feed my family for 2 years. Since the sales typically run in a 6-week rotation, I can purchase at rock bottom prices enough items to last me the next 6 weeks. I will usually purchase only as many items for which I have coupons to get that rock bottom price. Since I am willing to wait for a sale, I will be patient and not make my broccoli and cheese soup until the half and half and cheese goes on sale.

You can stockpile even if you don’t have a lot of space. Just purchasing one extra item at a rock bottom price will be a savings to your grocery budget. Start small as you find a system that works for you!

Next week, I will explain more about rock bottom prices, and how I determine that price for my family.

Filed Under: Pricing, Grocery Shopping, Food, Stockpile Tagged With: stockpile, rock bottom price, pasta, vegetables

Welcome to Using Time Wisely!


Presenting organizational tips and tricks to save you money, energy, and time.

To access 5 Ways to Using Time Wisely Today, click "like" on my facebook page and join in on the journey of Using Time Wisely.

Looking for something?

Email Newsletter

Sign up to receive email updates and to hear what's going on with us!

Copyright © 2025 · Lifestyle Pro Theme on Genesis Framework · WordPress · Log in