• Home
  • About Tracy
  • Contact Me

Using Time Wisely

Organized to save money, energy, and time

  • Email
  • Facebook
  • Pinterest
  • RSS
  • Twitter
  • YouTube
  • Document Organization
    • Overview
    • Box 1
      • Credit Report/Cards
        • Credit Reports
          • Credit Updates
          • Credit Scores
        • Credit Cards
      • Personal
      • Home Ownership
      • Vehicles
    • Box 2
      • Life Insurance
      • Major Medical
      • Tax-Favored Programs
      • Prescriptions
      • Dental & Vision
      • Special Health Policies
      • Short-term Disability
      • Long-term Disability
      • Personal Insurance
    • Box 3
      • Social Security Documents
      • Retirement
      • Investments
      • Estate Planning
      • Tax Records
  • Household
    • Cleaning
    • Maintaining
    • Organizing
    • Scheduling
      • Laundry
  • Event Planning
    • Assisting
    • Attending
    • Coordinating
      • Birthday Party
      • Christmas
      • Dinner Party
      • Fall Festival
      • Field Trip
      • Lemonade Stand
      • Thanksgiving
    • Learning
    • Preparing
    • Serving
  • Miscellaneous
    • Communication
      • Customer Service
      • E-mail
      • RSS Feed Reader
    • Goals
    • Organization
    • Time Management
      • To Do List
  • Food
    • Food Prep
    • Grocery Shopping
      • Lists
      • Pricing
    • Menu Planning
    • Recipes
    • Stockpile
  • Family Activities
    • Going Out
      • Free Outings
      • Inexpensive Outings
      • Summer
    • Rewards
      • Good Grades
      • Reading
      • Summer Reading
    • Staying at Home
  • Stretching Your Dollars
    • Daily Deals
      • Groupon
      • LivingSocial
    • Drugstores
      • CVS
    • Gas Prices
    • Gifts
    • On-line Shopping
    • Pictures
    • Products
    • Restaurants
    • School Items
    • Tips
You are here: Home / Archives for Household

Purging, Cleaning & Organizing: Warranty File

January 9, 2012 by Tracy

After sorting through all the paperwork from all the new electronics, gadgets, and toys, I went to add the documents to our warranty file, housed in a two-drawer filing cabinet. When I opened the bottom drawer, I found the file stuffed and in need of purging, cleaning, and organizing. Oh, my!

Seriously . . . it was a mess.

In case you are wondering about this file, the outside is usually covered with magnets which my girls enjoy putting on and taking off while I work at my desk. See the little finger prints all over the outside. 🙂 But inside, it holds all the documentation and receipts from purchases that carry a guarantee.

In using manila file folders, I label each folder with the type of documentation, e.g., phones, tools, appliances, furniture, etc. Over time, we replace items, donate, trash, or use the items.

Periodically, this file needs purging of obsolete items to keep the folder contents current. I think my “periodically”  extended a few years on this file because I found expiration dates from 2004.

I told you it was a mess.

In working on this project, I spent about 2 hours from purging to cleanup with a wonderful result.

Purging the Drawer

1. Gathered my supplies. After deciding to purge this file, I got the new documents, a pen, and manila file folders.

2. Purged each file. Removed one folder at a time and reviewed the contents. When I found paperwork for items we no longer have, I placed them in a trash pile (bottom right pile in picture below). The documents for items we are using were kept in the file.

3. Emptied the entire drawer. Taking out one file at a time, I worked through each file until the drawer was empty.

Cleaning the Drawer

1. Dusted the file drawer

2. Removed shreds of paper

3. Wiped the drawer clean

Organizing the Drawer

1. Arranged the file folders. In keeping this file divided into three sections, I placed each file folder into one of these three piles:

a. Structure of the house – windows, roof, shower units, etc.

b. Décor of the house – paint, ceiling fans, lighting, etc.

c. Products of the house – electronics, toys, jewelry, etc.

2. Combined file folder content. When I found similar products, I joined them into one category. For example, I placed the files for the lawnmower, edger, and weed whacker into one lawn equipment file folder.

3. Labeled each file folder. In keeping it simple, I wrote the category name on the label of the file folder. As I need items from this file, I can read the labels to quickly find the folder I need.

4. Returned folders to cabinet. With the sections organized and labeled, I placed them back into the filing cabinet. I used hanging file folders to divide the file folders into sections.


Cleaning Up

1. Trashed the unused file folders

2. Placed the outdated warranty pile in the To Be Shred box

3. Put away the pen and extra file folders

Instead of an overflowing heap of papers, I can open this drawer and find the document I need – with room to spare. In using time wisely for about 2 hours, I purged, cleaned, and organized my warranty file. For me, this was time well-spent.

As you find outdated systems, like overflowing paperwork, schedule time to purge, clean, and organize. Using time wisely can get you from “Oh, My!” to “Oh, yes!” Happy organizing!

Question: Where do you keep your warranty paperwork? Please add your answer to the comments.

Filed Under: Cleaning, Household, Organizing Tagged With: cleaning, organizing, purging

Dining Room: Container Organization Improvement

January 16, 2012 by Tracy

One of my projects for 2012 is purging, cleaning, and organizing my entire house. Thus far in the process, I have finished the dining room and living room. My progress is slow, but I am enjoying the help from my children and the result.

Having recently organized bookshelf #1 and #2 in my dining room, I did not like looking at all the stuff at each meal. (Yes, it is unusual to have bookshelves in one’s dining room, but it works for us.)

As a fan of container organization, I waited for a sale on fabric cubes since I refuse to pay full price for items when they will go on sale. With the sale, I stocked up on the cubes and went to work on my dining room.

Before Adding the Containers


After Adding the Containers


The container organization was a little change resulting in an improvement to the look and feel of my dining room. These fabric cubes, purchased at Target, hold our many craft items. One bin houses our paints, another keeps our crayons, markers, and coloring books, a different one holds the play dough and accessories, and the rest workbooks, school documents, and school supplies.

I love the process of removing one bin and using the items. When finished, we pack it back up and return it to the shelf. Now I need to get the bins labeled. 😉

The lead-in picture shows the result of purging, cleaning, and organizing my dining room. Did you notice the Christmas presents on top of the chairs? When my family comes for a visit in a few weeks, we will be celebrating. *Woo hoo!*

My progress might be slow, but it is progressing forward. If you are working on a goal that keeps getting trumped with sick children, car repairs, or exhaustion, then give yourself some space. Take care of the immediate needs. Feed, clothe, and snuggle with your little ones.

As you snag a few minutes here and there, prepare a plan for that goal. When you execute that plan, attack that goal head on while using time wisely. Happy organizing!

Filed Under: Household, Organizing Tagged With: dining room

Organizing: Creating Play Stations

January 23, 2012 by Tracy

With three children, who are two years apart and both genders, our house has a range of toys. Without an organizational system, we would live among the toys. 😉

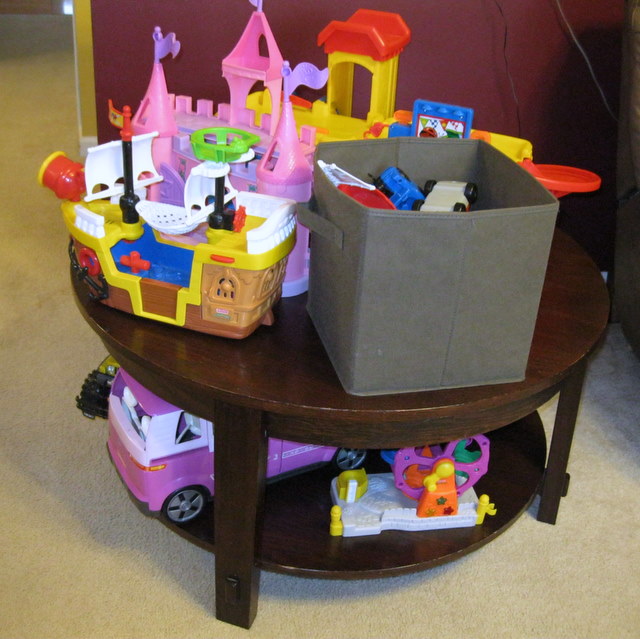
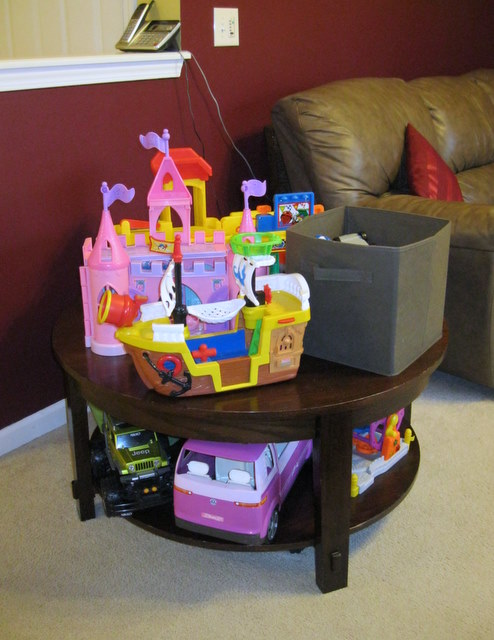
In working through each room of my house clearing out clutter, cleaning, and organizing, I decided to try creating a Little People play station for my girls.

Though my son has out-grown most of the Little People items, he does enjoy playing with the toddler. However, my girls will be playing more at this station than my son.

Determining the Functions of the Play Station

Since this space is mostly for my girls, I needed the play station to meet the following criteria:

1. Low enough for the toddler to reach.

2. Large enough to hold the 8-10 Little People play units.

3. Wide enough for both girls to play at the same time.

4. Room enough to move around the station without blocking traffic.

5. Small enough to fit in our living room with the rest of the toys.

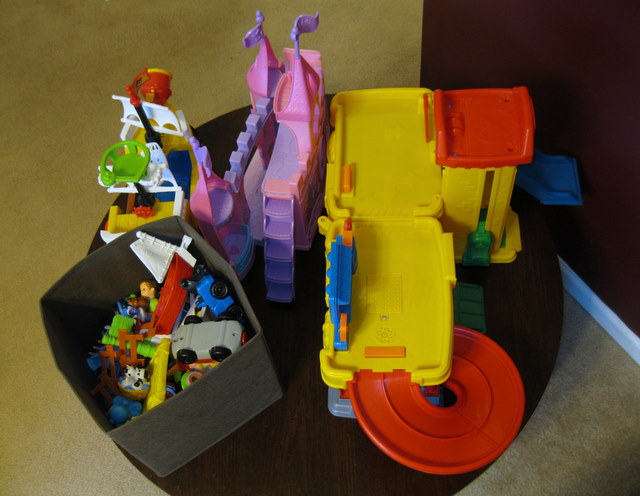
Keeping within my limited budget, I surveyed our current options and found that our circular coffee table (which has never been used as a coffee table since my children overtake most of the furniture in the house) fit all these standards. With a $6 fabric bin to hold all the accessories, this play station exceeded my expectations.

Evaluating the Workability of the Play Station

1. My toddler loves to help clean up all the accessories since she can put the people in the box.

2. The lower level of the table holds other play units when the girls are ready for a change.

3. Both girls can play – one on each side of a play unit without getting in each other’s way.

4. The girls love playing with multiple play units at one time.

5. The circular coffee table solution continues to offer hours of fun without overtaking the space with toys.

This play station for Little People works for us. The one container for all the accessories transformed the Little People population in our living room. With one place for all the items, cleanup is easy and often done without asking. Love that!

As you continue finding organizational solutions for your household, consider creating a play station. This same system might work for legos, Star Wars, or dolls. With a simple construction play station, your children might surprise you with a picked-up area. 🙂 Happy organizing!

Question: What types of toys invade your space? Please add your answer to the comments.

Filed Under: Household, Organizing Tagged With: organizing

Maintaining: Preserving your Children’s Artwork

January 30, 2012 by Tracy

Paper clutter can quickly overtake a space. Without constant attention, my kitchen counter will sport a mound of paperwork by the end of each day.

On top of the normal mail items, you probably have lots of school paperwork and artwork to handle. Though I enjoy all the lovely art projects brought home, I refuse to keep paper clutter.

The Dilemma

Realizing that my son worked hard on his projects and wants to display them, how do I find space for these items when they will be forgotten by the end of the week?

My Immediate Solution

Allow my son to display his beautiful artwork on our kitchen bar. The displayed artwork is visible and accessible for a few days.

My Permanent Solution

After a few days, I will ask my son if he still needs his artwork displayed. If he wants to keep it a little longer, he will ask. But if done with the project, he responds with, “Mom, you can do whatever you want with it.”

When I get the latter answer, I will take a picture of the item and then toss it in the trash. Yes, throw the item away because I have preserved the artwork via a photograph.

The picture solution is a win-win situation in our home. In using time wisely, our family can view the item at anytime without cluttering our living space.

By reaching a solution to one part of the paper trail, I can decrease clutter while preserving my children’s artwork. With my child’s consent, I throw away without guilt the bulky poster boards, irregular shaped foam boards, and sculptures because I have a photograph of his art projects.

By keeping the paper count from my children’s artwork low, I am free to work and play at home with a preserved photograph and without a sea of clutter.

Did I step on your toes? If you tend to hoard everything, then clutter will weigh you down. Rise above the clutter, take control, and only keep your favorites. You can create a beautiful organized space only after you get rid of the clutter. Choose wisely!

Question: How do you preserve your children’s artwork? Please add your answer to the comments.

Filed Under: Household, Maintaining Tagged With: Children's items

Cleaning: Ceiling Fans

February 6, 2012 by Tracy

As I continue to work through my home room by room, I clean from top to bottom and from left to right. In each room, I start with the lighting fixture and/or the ceiling fan.

With my 5’4” stature, I often use a chair or step stool to reach the fans and lights. This method allows me to reach all the surfaces. For the most part, this system keeps my home clean. But once or twice a year, I work through my home giving it a deep clean.

The deep clean requires getting above the blades to see what dirt and dust needs removal. Most of the rooms have small amounts of dust build-up. The one fan that accumulates lots of dirt and grime is the kitchen fan. Located near the stove and oven, the fan collects grime due to the settling condensation on the blades mixing with the daily dust.

As I worked around my kitchen, I spent a good 30 minutes wiping down each fan blade and light globe. The result was a clean fan and a filthy floor.

But in working from top to bottom, I only need to clean each item once. The floor is the last item cleaned in each room.

In using time wisely, I rose above the fan, examined the situation, and the cleaned off the grime. Though it would have been easy to overlook the dirt-covered blades on the fans, I chose to rid my house of the clutter, dust, dirt, and grime.

Cleaning the ceiling fans thoroughly keeps our home clean. By completing the deep cleaning twice a year, I save energy and time for the next six months by dusting the surfaces. As you schedule your cleaning, consider deep cleaning occasionally while keeping your surfaces clean. Happy cleaning!

Question: How often do you clean your ceiling fans? Please add your answer to the comments.

Filed Under: Cleaning, Household Tagged With: household

« Previous Page
Next Page »

Welcome to Using Time Wisely!


Presenting organizational tips and tricks to save you money, energy, and time. Enjoy the journey of Using Time Wisely.

Looking for something?

Copyright © 2026 · Lifestyle Pro Theme on Genesis Framework · WordPress · Log in