• Home
  • About Tracy
  • Contact Me

Using Time Wisely

Organized to save money, energy, and time

  • Email
  • Facebook
  • Pinterest
  • RSS
  • Twitter
  • YouTube
  • Document Organization
    • Overview
    • Box 1
      • Credit Report/Cards
        • Credit Reports
          • Credit Updates
          • Credit Scores
        • Credit Cards
      • Personal
      • Home Ownership
      • Vehicles
    • Box 2
      • Life Insurance
      • Major Medical
      • Tax-Favored Programs
      • Prescriptions
      • Dental & Vision
      • Special Health Policies
      • Short-term Disability
      • Long-term Disability
      • Personal Insurance
    • Box 3
      • Social Security Documents
      • Retirement
      • Investments
      • Estate Planning
      • Tax Records
  • Household
    • Cleaning
    • Maintaining
    • Organizing
    • Scheduling
      • Laundry
  • Event Planning
    • Assisting
    • Attending
    • Coordinating
      • Birthday Party
      • Christmas
      • Dinner Party
      • Fall Festival
      • Field Trip
      • Lemonade Stand
      • Thanksgiving
    • Learning
    • Preparing
    • Serving
  • Miscellaneous
    • Communication
      • Customer Service
      • E-mail
      • RSS Feed Reader
    • Goals
    • Organization
    • Time Management
      • To Do List
  • Food
    • Food Prep
    • Grocery Shopping
      • Lists
      • Pricing
    • Menu Planning
    • Recipes
    • Stockpile
  • Family Activities
    • Going Out
      • Free Outings
      • Inexpensive Outings
      • Summer
    • Rewards
      • Good Grades
      • Reading
      • Summer Reading
    • Staying at Home
  • Stretching Your Dollars
    • Daily Deals
      • Groupon
      • LivingSocial
    • Drugstores
      • CVS
    • Gas Prices
    • Gifts
    • On-line Shopping
    • Pictures
    • Products
    • Restaurants
    • School Items
    • Tips
You are here: Home / Archives for Household

Decorating: Toilet Paper Roll Rings

January 6, 2014 by Tracy

Decorating: Toilet Paper Roll Rings

Decorating: Toilet Paper Roll RingsYes, I really did title this post decorating with toilet paper roll rings. You see, we are rearranging living quarters in our home. No worries, Paul and I are still in the master bedroom. It’s our 3 children, who are playing musical beds.

In our three-bedroom home, Miss 3 had the nursery to herself while Mr. 8 and Miss 6 shared the second bedroom. With bunk beds, Mr. 8 slept on the top bunk while Miss 6 burrowed in the bottom bunk. As Miss 3 is growing out of her crib, it was time to say goodbye to the nursery.

Over Christmas break, Paul worked hard moving furniture, repairing nicks, painting walls, and hanging decorations. When Mr. 8 and I worked on setting up his room, he did not have many items for his dresser.

He does have a number of signed baseballs but placing them on the dresser was not working. We needed a way to display them without having them roll off the dresser.

Having taken a break to help Miss 3 with potty training, I switched the toilet paper roll and had an idea: why not try cutting the toilet paper roll into rings on which to place the baseballs? Ta da! It worked. They are not painted or covered in pretty paper, but they are functional. And the important part is Mr. 8 loves it.

Decorating: Toilet Paper Roll Rings

When needing a little help, I’m finding that a little creativity is the key. Thankfully, this solution was quick, easy, and FREE. My decorating is not fancy as I’m happy with paint, uncluttered surfaces, and sufficient storage.

I even get excited over toilet paper roll rings keeping baseballs from rolling off dressers. Now what creative use can I find for all these loom bands I keep finding on our carpet? 😉 Happy creating!

Question: What creative solutions have you found around your house?  

Filed Under: Decorating, Household Tagged With: decorating

Organization: Christmas Wrapping

December 30, 2013 by Tracy

Organization: Christmas Wrapping

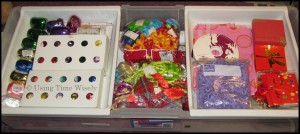
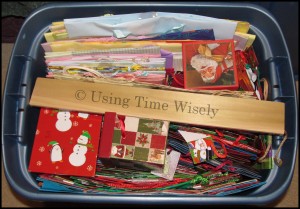
Organization: Christmas WrappingIn winding down 2013, our family keeps our Christmas tree up through the New Year. We enjoy sitting by the lights in the evening as our nights are later without the early morning school schedule. Though our tree is still up, most of the gifts have found a home and our Christmas wrapping organization continues.

After the unwrapping and opening of gifts, we usually have a pile of bags, boxes, and containers. In stretching our dollars, we reuse most of these items. As I check for tears and names written on the gift bags, I toss any unusable items and organize the ones I can use again.

Keeping our Christmas wrapping organized into 2 totes and 1 container, I choose to purge, sort, and take inventory before storing them away.

Purging our Christmas Wrapping

Any items that are ripped, broken, or crunched get trashed. As multiple family members add and remove items from these containers, some of the items get crammed or ripped in the process. Ridding the containers of these items leaves room for other items that will get used again.

Organization: Christmas WrappingSorting our Christmas Wrapping

Though I keep one tote for baby, birthday, and all occasion wrapping, sometimes the Christmas wrapping gets placed in the wrong tote.

By sorting the bags and boxes, I can accurately keep all Christmas items together while separate from the birthday and baby boxes and bags.

Taking Inventory of our Christmas Wrapping

With all the items purged and sorted, I can see where I need to replenish our supply. As I am out shopping, I can snag some more gift sacks and gift tags at low prices knowing I will need a few more for next year. Knowing that I need these items removes any doubt when I see a great sale. I know that I need them, so I can pick them up to replenish our supply without wondering if I will have too many next year.

As the Christmas wrapping only comes out during the month of December, I find the best time to organize these supplies is before putting them back into storage. My time is best spent after the hustle and bustle of the gift giving, and I have gathered all the items for storage.

This organizational system holds our items for next year’s celebration. With our Christmas wrapping purged, sorted, and inventory taken, we can refill with the after-Christmas sales or wait until next season. The totes keep out bugs and water to protect our investments for years to come while keeping our Christmas wrapping organized.

Before packing all the items away to deal with next year, take a few moments to purge, sort, and take inventory. This way, you can keep an eye out for items you need and bypass items you already have organized. Happy storing!

Question: Do you organize your Christmas wrapping before, after, or not at all during the season?

Filed Under: Household, Organizing Tagged With: organization, Christmas

Scheduling: My Thanksgiving Week Plan

November 25, 2013 by Tracy

Scheduling: My Thanksgiving Week Plan

Photograph Credit: Microsoft Images

Thanksgiving Week is here in the United States. Yay! This week brings a bit more relaxing to our schedule as my children are out of school the entire week.

Having been cleaning on and off for the past few weeks, I have made lots of progress though I am not finished. In preparing for our Thanksgiving Feast on Thursday, I choose to start with a plan.

Last year, I shared my overview which worked well. This year, I am still cleaning, so I have a more detailed plan to get me from here to there:

Monday

  • Pickup the downstairs
  • Quick clean the downstairs half bathroom
  • Enjoy my children being home
  • Write a couple blog posts

Tuesday

  • Finish any last minute shopping
  • Start brining our turkey (Paul prepares the brine. :D)
  • Clean master bathroom and bedroom
  • Enjoy my children being home
  • Write a blog post or two

Wednesday

  • Bake pies and cake
  • Work on laundry
  • Clean my children’s rooms
  • Write a blog post

Thursday

  • Happy Thanksgiving!
  • Bake the turkey and fixings
  • Host Thanksgiving at our home with family and friends
  • Take Back my Kitchen
  • Watch football
  • Enjoy the day with friends
  • Watch A Charlie Brown Thanksgiving with my children

Friday

  • Host a play date with out-of-town guests
  • Pack up Thanksgiving items
  • Start decorating for Christmas
  • Watch football
  • Enjoy the day with my family
  • Write a blog post

Saturday

  • More Christmas decorating
  • Finish any cleaning
  • Watch football
  • Enjoy our family
  • Write a blog post

Our Thanksgiving Week is underway. Though I may not get everything marked off my list, I have a plan from which to start each day. If you are celebrating Thanksgiving this week, then I wish you a blessed week of thankfulness and gratitude among the cleaning, preparing, and scheduling. Keep using time wisely as you celebrate this week!

Question: What tasks are you hoping to cross off your list this week?

Filed Under: Household, Scheduling Tagged With: scheduling

Cleaning: Take Back your Kitchen – Part 2 of 2

November 18, 2013 by Tracy

Cleaning: Take Back your Kitchen – Part 2 of 2

Photograph Credit: Microsoft Images

When Paul and I lived in our apartment, we had limited countertop space. Our entire kitchen was in the shape of an “L” and included our refrigerator, sink, and dishwasher.

As I made large meals, like a Thanksgiving feast, we spread out into our dining room. Though it made more of a mess, I needed the space in which to work.

In that tight space, we had a sink without a divider, so it was a bit more difficult to clean.

Continuing our Take Back your Kitchen post from Part 1, I remember maneuvering in that tiny space to take back my kitchen with a big sink without a divider.

Part 2: Take Back Your Kitchen without a Divided Sink

1. Prepare the Dishwasher

When everything in the kitchen is in disarray, concentrate on the dishwasher. If the dishes are clean, then put them away to have a clean space.

2. Empty the Sink

Without a divided sink, I could not tell what was rinsed and what needed to be rinsed. When I went to clean, I just piled everything on the counters. With an empty sink, I washed it out.

3. Setup Boundaries

Then I began rinsing items and placing them directly in the dishwasher since I had no clean countertop space.

My dishwasher was to the left of my sink, so I worked from left to right to clear off my counters. I rinsed until I had fully loaded the dishwasher.

4. Start the Dishwasher

With the dishwasher full, I started the cycle. Our dishwasher was not large, so I usually had more dishes left to rinse or wash.

5. Take a Break

At this point, I usually needed a break as I was transitioning between mostly dirty dishes to mostly rinsed and clean dishes. Depending on how much of a break I needed, I might just sit for a few minutes and then get back up to finish.

6. Designate a Hand Wash-Only Counter

After my break, I came back to reorganize. I would remove any remaining items on the left countertop and clean the surface. I would then place any dishes that needed handwashing into the sink leaving all the other dirty dishes on the right countertop.

7. Hand Wash the Special Dishes

In the clean space to the left, I put down a towel. Then I hand washed the items and set them on the towel to dry. If large pots still needed cleaning, I washed those by hand to free up space in our dishwasher.

8. Clear off the Counters

By now, my left kitchen counter was clean. I concentrated on rinsing the remaining dirty dishes and stacking them on the right counter or to one side in the sink.

9. Finishing Touches

With all the dishes either cleaned or rinsed and ready for the dishwasher, I added these finishing touches:

      • Wipe down all surfaces
      • Run the garbage disposal
      • Clean the sink or the half not in use
      • Sweep the kitchen floor (if the floor is dry)
      • Remove any spills or marks on the kitchen floor
      • Go rest with my family

Getting back your kitchen is hard within a small space. I have been in homes where there was not enough room for two people to be in the kitchen at the same time. Though working in a tight space is difficult, it is not impossible to creatively entertain and clean.

Investing in the lives of others is an admirable way to using time wisely. Taking back your kitchen is a job that often goes unnoticed, but a task that must be done. Having a plan in place to tackle the dirty dishes makes the process a bit easier. Discover what works best for you as you entertain, serve, and take back your kitchen. Happy cleaning!

Question: What are your tips for working in a kitchen with limited space? 

Filed Under: Cleaning, Household Tagged With: cleaning

Cleaning: Take Back your Kitchen – Part 1 of 2

November 11, 2013 by Tracy

Cleaning: Take Back your Kitchen – Part 2 of 2
Cleaning: Take Back your Kitchen – Part 1 of 2

Photograph Credit: Microsoft Images

As I found myself cleaning our kitchen and not finding a clean surface on which to work, I was inspired to write this two-part post in preparation for Thanksgiving.

During times of celebration, I get out of my rhythm as more people are milling about the kitchen and helping to prepare and serve.

With the more people involved, I find more mess accumulates. At the end of the wonderful celebration, I am left with a sink of dirty dishes, messy countertops, and little motivation to start another project.

Now, my fantastic husband usually cleans it all up after big events. Realizing that not everyone has that kind of help and there are other times that the kitchen is in upheaval, I will share from my experiences how to take back your kitchen.

In part 1, I will share how I work through the mess with a dishwasher and a divided kitchen sink. In part 2, I will share how I would clean up if I had a dishwasher and a big kitchen sink without a divider. In getting back our kitchen, I can muster the motivation needed by visualizing my once-cleaned space, roll up my sleeves, and start.

Part 1: Take Back Your Kitchen with a Divided Sink

1. Prepare the Dishwasher

When everything in my kitchen is in disarray, I concentrate on the dishwasher. If the dishes are clean, then I put them away without setting them on any counter. With an empty dishwasher, I now have one clean space in which to work. 😉

2. Evaluate the Sink

With a divided sink, I keep the rinsed-off dishes that are ready for the dishwasher in the left side. The dishes on the right side still need rinsing/cleaning. When other helpers come into the kitchen, they do not usually follow my system. If I cannot tell which items have been rinsed, then I unload the sink and start over.

3. Setup Boundaries

With the sink unloaded, I start on the right side because this is where our garbage disposal is located. Any food particles can just go through the disposal throughout the cleanup process. I rinse and remove food particles from the dishes and place them in the left side of the sink. I continue to clean until the left side is full.

4. Return to the Dishwasher

With the left side of the sink full, I open the dishwasher and begin loading using the rinsed off dishes. If I fill up the dishwasher, then I add the detergent and start the load. If I still have room in the dishwasher, then I return to the sink and keep rinsing off items. Once the dishwasher is completely full, I get it going.

5. Take a Break

At this point, I usually need a little break. With my “helper” (the dishwasher) still cleaning, I go sit down for a few minutes.

6. Designate a Hand Wash-Only Counter

After my break, I come back to see what dishes are still remaining. If I have hand wash-only dishes, then I designate one counter or space for those items. I gather the platters, silverware, glasses, or anything else that needs handwashing and place it in that space.

7. Return to the Sink

Back at the sink, I rinse off any remaining items and stack them carefully on the left side. If food still needs to be put away, I find an empty space and clean it up.

Then I transfer the food to plastic containers, put them in the freezer or refrigerator, and place the dirty dishes to the right side of the sink. Once all the food is put away, then I finish rinsing the dirty dishes and place them in the left side of the sink.

8. Clean the Counters

By now, the end is in sight, and the only dishes left are in the handwashing pile. I need a space for the clean dishes, so I wipe down all the counters, stove, and any other appliances that need cleaning.

9. Hand Wash the Special Dishes

In the clean spaces, I usually put down a towel. Then I hand wash the items and set them on the towel to dry. If large pots still need cleaning, I tend to hand wash those to get them out of the way. Once all the handwashing is complete. I just need to tidy up.

10. Finishing Touches

With all the dishes either cleaned or rinsed and ready for the dishwasher, I add these finishing touches:

      • Wipe down all surfaces
      • Run the garbage disposal
      • Clean the sink
      • Sweep the kitchen floor (if the floor is dry)
      • Remove any spills or marks on the kitchen floor
      • Go rest with my family

Getting back my kitchen is a process. Thankfully, this process is not an everyday occurrence. The times I use this system are when we entertain or have a complex meal.

As our Thanksgiving celebration is fast approaching, I have a plan in place. It might take time to accomplish the project, but I will know where to start when I am ready to tackle the kitchen.

When you get to where you cannot find a clean space in your kitchen, discover how to take back your kitchen. Feel free to use and adjust my system until you master a process that works best for you. Happy cleaning!

Question: How do you take back your kitchen when you cannot find a clean space?

Filed Under: Cleaning, Household Tagged With: cleaning

« Previous Page
Next Page »

Welcome to Using Time Wisely!


Presenting organizational tips and tricks to save you money, energy, and time.

To access 5 Ways to Using Time Wisely Today, click "like" on my facebook page and join in on the journey of Using Time Wisely.

Looking for something?

Email Newsletter

Sign up to receive email updates and to hear what's going on with us!

Copyright © 2025 · Lifestyle Pro Theme on Genesis Framework · WordPress · Log in