 With entertaining company, accumulating new items, and visiting friends and family, my house (except for my dining room) needs attention. My progress is slow, but I’m gaining momentum. On the agenda today is grocery shopping.
As I scrape together meals on what we have on-hand (or borrow from my fabulous neighbor :-)), I value the buying ahead principle. Keeping my refrigerator, freezer, and pantry well-stocked with merchandise purchased at rock bottom prices stretches our budget, especially when life gets busy.
At the beginning of December 2011, I introduced step six: giving your groceries a home. In part 1, I shared how I unload my savings upon returning from the grocery store. The next week in part 2a, the cold items were given a home on designated shelves and sections of my refrigerator and freezer. Today, I will continue with the series on organizing my pantry with the remaining deals from grocery shopping.
Pantry
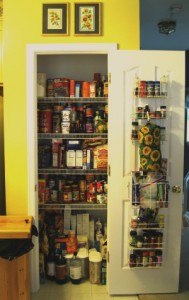
Finding an organizational system that works for you may take some time. I share with you my system that has evolved over the years. Since I am shorter (5’4”), I place most of the items on shelf #2 and lower. The top shelf houses items I use infrequently since I have more difficulty reaching those items. With that said, I still use the shelf, I just ask my tall (6’2”), handsome hubby to use his strong muscles to help this damsel in distress with her 5 lb. bag of flour. 🙂
Tracy’s Pantry Organization:
Shelf #1 (top shelf) – flour, confectioner’s sugar, brown sugar, cake mixes, brownie mixes, and spices
Most of my spices stay on two racks on the inside door of my pantry. The spices on the top shelf are rarely used or the containers are too big to fit in my rack.
Shelf #2 – condiments, dry oatmeal, bread crumbs, pudding, and jello
Shelf #3 – pasta, rice, sides, popcorn, crackers, and a basket with baking ingredients (chocolate chips, marshmallows, etc.)
Shelf #4 – canned goods and instant beverage mixes (tea bags, hot cocoa, lemonade, etc.)
Floor of pantry – bottled beverages, chips, cereals (boxed and instant – oatmeal, grits), sugar, and snacks
By designating the type of items for each shelf, I can easily find the ingredients I need. Sometimes one shelf will get overloaded from a great sale, and I will “borrow” space from another shelf until space becomes available.
I also keep a box out in my garage for overflowing items, like the extra 6 bags of 4 lb. sugar packages I purchased for $.71 (shared this deal on Facebook on November 24).
Tracy’s Tips:
1. Keeping snacks and cereal at the bottom allows little ones to help at meal time.
2. Can goods dropped from any height could crack or damage your floor. Though I have not had this happen to my floor, I have had my toes crushed. Ouch!
3. Keeping like items together aids in making your grocery list as you scan your available resources
4. Add newly purchased items to the back and bring previous purchased items to the front. Keeping the items rotated will help prevent purging expired items.
5. When an arrangement is not working, fix it. The longer it bothers you, the more time you waste.
6. Teach your little ones your organizational system. They LOVE being big helpers (most of the time).
By the time my pantry items are on assigned shelves, my groceries have all been given a home. In using time wisely, I usually reorganize my pantry at least twice a year. Anytime the shelves get a little thin, I use that opportunity to reorganize before restocking.
As you find an organizational system that works for you, putting your groceries away and retrieving them will take little time. Keep plugging away while using time wisely, and happy organizing!
Question: How do you organize your pantry? Please add your answer to the comments.