• Home
  • About Tracy
  • Contact Me

Using Time Wisely

Organized to save money, energy, and time

  • Email
  • Facebook
  • Pinterest
  • RSS
  • Twitter
  • YouTube
  • Document Organization
    • Overview
    • Box 1
      • Credit Report/Cards
        • Credit Reports
          • Credit Updates
          • Credit Scores
        • Credit Cards
      • Personal
      • Home Ownership
      • Vehicles
    • Box 2
      • Life Insurance
      • Major Medical
      • Tax-Favored Programs
      • Prescriptions
      • Dental & Vision
      • Special Health Policies
      • Short-term Disability
      • Long-term Disability
      • Personal Insurance
    • Box 3
      • Social Security Documents
      • Retirement
      • Investments
      • Estate Planning
      • Tax Records
  • Household
    • Cleaning
    • Maintaining
    • Organizing
    • Scheduling
      • Laundry
  • Event Planning
    • Assisting
    • Attending
    • Coordinating
      • Birthday Party
      • Christmas
      • Dinner Party
      • Fall Festival
      • Field Trip
      • Lemonade Stand
      • Thanksgiving
    • Learning
    • Preparing
    • Serving
  • Miscellaneous
    • Communication
      • Customer Service
      • E-mail
      • RSS Feed Reader
    • Goals
    • Organization
    • Time Management
      • To Do List
  • Food
    • Food Prep
    • Grocery Shopping
      • Lists
      • Pricing
    • Menu Planning
    • Recipes
    • Stockpile
  • Family Activities
    • Going Out
      • Free Outings
      • Inexpensive Outings
      • Summer
    • Rewards
      • Good Grades
      • Reading
      • Summer Reading
    • Staying at Home
  • Stretching Your Dollars
    • Daily Deals
      • Groupon
      • LivingSocial
    • Drugstores
      • CVS
    • Gas Prices
    • Gifts
    • On-line Shopping
    • Pictures
    • Products
    • Restaurants
    • School Items
    • Tips
You are here: Home / Archives for decorating

Decorating: Toilet Paper Roll Rings

January 6, 2014 by Tracy

Decorating: Toilet Paper Roll Rings

Decorating: Toilet Paper Roll RingsYes, I really did title this post decorating with toilet paper roll rings. You see, we are rearranging living quarters in our home. No worries, Paul and I are still in the master bedroom. It’s our 3 children, who are playing musical beds.

In our three-bedroom home, Miss 3 had the nursery to herself while Mr. 8 and Miss 6 shared the second bedroom. With bunk beds, Mr. 8 slept on the top bunk while Miss 6 burrowed in the bottom bunk. As Miss 3 is growing out of her crib, it was time to say goodbye to the nursery.

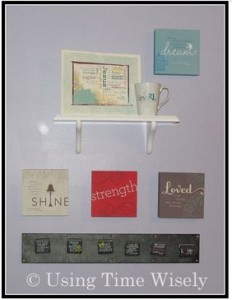
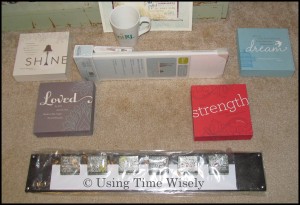
Over Christmas break, Paul worked hard moving furniture, repairing nicks, painting walls, and hanging decorations. When Mr. 8 and I worked on setting up his room, he did not have many items for his dresser.

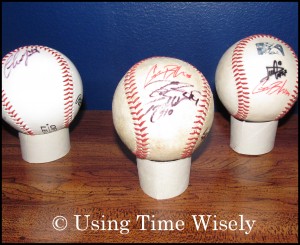
He does have a number of signed baseballs but placing them on the dresser was not working. We needed a way to display them without having them roll off the dresser.

Having taken a break to help Miss 3 with potty training, I switched the toilet paper roll and had an idea: why not try cutting the toilet paper roll into rings on which to place the baseballs? Ta da! It worked. They are not painted or covered in pretty paper, but they are functional. And the important part is Mr. 8 loves it.

Decorating: Toilet Paper Roll Rings

When needing a little help, I’m finding that a little creativity is the key. Thankfully, this solution was quick, easy, and FREE. My decorating is not fancy as I’m happy with paint, uncluttered surfaces, and sufficient storage.

I even get excited over toilet paper roll rings keeping baseballs from rolling off dressers. Now what creative use can I find for all these loom bands I keep finding on our carpet? 😉 Happy creating!

Question: What creative solutions have you found around your house?  

Filed Under: Decorating, Household Tagged With: decorating

Organizing: Art Supplies

October 14, 2013 by Tracy

Organizing: Art Supplies

Organizing: Art SuppliesMy 6-year-old jumps from craft to craft. My mom was so helpful this summer with project ideas to keep her interested and busy.

Though I enjoy some crafts, Miss 6 enjoys all things creative. Thankfully, our dollar store carries a large number of diverse crafts that kept her busy.

She painted by number, created sticker mosaics, worked with beads, painted magnets, and colored velvet.

With partial projects done and leftover supplies for additional crafts, our art supplies were overflowing from their designated container.

Organizing: Art Supplies

When that happens, it is time to organize or re-organize. This project took less than half an hour and was worth the investment of time.

Organizing: Art SuppliesRemove all Items

The first step was to remove all the items from the craft box and gather any miscellaneous items that would not fit within the box.

Purge Items

I then tossed trash, removed extra packaging, and removed old or unusable items from the supplies.

Sort the Items

With my table full of paint, stickers, and markers, I began sorting like items together. I chose to sort by project (e.g., paint, markers, stickers, etc.).

Organizing: Art SuppliesConsolidate the Items

We had lots of stickers leftover from projects. I tossed the packaging and put all the extra pieces in a sandwich-size baggie which saved space. I repackaged similar items to make accessing them easier.

Organize the Items

Putting the items back into the space, I put like items together and used containers to compartmentalize different projects. I had a large box that held ready-to-do crafts.

Return Box to Shelf

With all the items organized and put back into the space, I had filled the container without an overflow.

During this fall as the rain and cooler temperatures drive us inside, I am prepared to give Miss 6 craft projects to promote her creativity and need for expression. Part of the fun is discovering new projects to do with the available supplies.

As seasons and interests change, I am always finding something new to organize or re-organize. Keeping up with the changes as they occur allows me to nip these projects when they are small. If I let the situation continue, then I will need to invest lots of time to get the project organized.

In using time wisely, I try to organize at least one box, shelf, drawer, cabinet, or closet each week. For me, there is always something we have outgrown or can better use, so I love the challenge. Having this art supply project complete just makes me smile. Happy organizing!

Question: What is a current area that your family has outgrown that needs organization? 

Filed Under: Household, Organizing Tagged With: decorating

Decorating: Hanging Wall Art – Part 3 of 3

October 7, 2013 by Tracy

Decorating: Hanging Wall Art - Part 3 of 3

Decorating: Hanging Wall Art - Part 3 of 3Getting wall art from the box to the wall is a process for me. I tend to take my time and get it right. Once in place, items stay for years.

Our living room wall arrangements have seen one change in six years. That change was swapping our large mirror for a flat panel television. The pictures, frames, and decorations have remained the same.

Since I do not change my mind often, I do not just slap items on the wall. I take my time – as you have learned through this short series.

In part one, I experimented with my wall art, and in part two, I sketched my wall art. Now, it is time to hang my wall art.

Step Three: Hang the Wall Art Arrangement

After working at my desk with the sketch of my wall art arrangement hung on the wall, I wait until I know that this arrangement will work. Then, I ask for help because it lands on my husband’s “honey-do” list.

When he is available, he gathers his tools: stud finder, charged drill, and hardware. Placing all the items that need to be hung on my desk, he gets to work hanging the wall art in place:

1. Decorating: Hanging Wall Art - Part 3 of 3Checks Wall Placement

He uses the stud finder to determine where the main posts are in the wall before he drills holes.

2. Gets Hardware

For this arrangement, the shelf and the magnetic board came with hardware. Paul retrieved 4 more screws for the block prints.

3. Drills Holes

Using the poked holes in the paper, Paul drills holes into the wall and removes the screws. He does this for each hole marked on the paper.

4. Removes Paper

With the paper removed, the wall reveals the holes where the screws need to go.

5. Adds Hardware

Learning from a contractor, who repaired our bedroom closet when the wiring shelving fell off the wall, Paul uses wall anchors to stabilize the wall art. He places the wall anchor into the hole. Then he screws in the hardware for a firm fit.

6. Hangs Wall Art

With the hardware in place, Paul hangs each wall art item for a perfect placement.

In using time wisely, I take a few minutes each day for a week or two to plan this project. When I need the help, Paul can accomplish this task efficiently and without needing someone to “see” if the art work is level or off-center. Though it takes more time to plan than just sticking it up on the wall, I am very happy with the result and will admire this wall art arrangement often.

As you decorate your home and hang items on the wall, planning ahead will save you from rearranging or finding that one item is higher than another when installed. You might need to wait a few days, but the wait will be worth it once you see your vision on the wall. Happy decorating!

Question: What are your hanging wall art tips?

Filed Under: Decorating, Household Tagged With: decorating

Decorating: Hanging Wall Art – Part 2 of 3

September 30, 2013 by Tracy

Decorating: Hanging Wall Art – Part 2 of 3

Decorating: Hanging Wall Art – Part 2 of 3Having rented an apartment and townhouse for six years and looking at white walls, I was ready to decorate when we purchased our home almost 10 years ago. Since we were having our home built, I had a good 6 months to play with paint swatches and textures, and I did.

By the time we moved in, I had the colors chosen. Paul spent the first 2 years scraping popcorn from the ceilings and painting each room of our home. The result was a colorful home without any white walls. 😉

Content with our color choices, I am still careful not to damage the walls or add unnecessary marks or holes. In the first part of this hanging wall art series, I explained how I experiment with the wall art to find my favorite arrangement. Moving on to part two, I sketch the wall art arrangement.

Step Two: Sketch the Wall Art Arrangement

Decorating: Hanging Wall Art – Part 2 of 3With my wall art arranged on the floor, I take a large sheet of paper. I use a small easel pad that I received as a sample from Post It. This paper is peel ‘n stick which makes it nice to stick to the wall.

Taking the paper, I transfer the wall art onto the paper in the same arrangement. Using a pencil, I trace each item. Before removing the wall art, I poke a small hole in the paper where the nail or screw should go for easy alignment.

Removing the wall art from the paper, I have a complete sketch of the wall art arrangement. With the peel ‘n stick property of the paper, I just put up the paper and adjust on the wall until I find the perfect spot. I then stabilize the page with masking tape.

Similar to how I experiment, I leave the paper on the wall for a few days. I check to see if I will bump my head or knock anything off the wall. In this arrangement, the bottom item I am hanging is a magnet bar with clips. This piece will hold items in place which I will need to easily reach from my desk without accidentally knocking them when filing paperwork or functioning at my desk.

As this wall art serves both a decoration and a utility function, I needed to try out the arrangement before hanging it up permanently. That magnetic bar is heavy and the screws are big, so I wanted to be sure we did this arrangement correctly the first time.

After a few days, I realized that my arrangement was too high, so I readjusted my arrangement with less width and more height to meet my needs. Having the sketch on the wall helped me identify the distance before putting it on the wall and having to readjust and hide previous holes in the wall.

In using time wisely, I took my time about hanging this wall art arrangement. I experimented before sketching the arrangement on paper to display. Then I adjusted the paper as needed until I found the right height and arrangement that worked for me.

The last installment of this 3-part series will reveal the final results along with tips for hanging the wall art arrangement. As you decorate, finding the best arrangement is possible with a little patience, creativity, and planning. Happy decorating!

Question: Do you sketch your wall art arrangements before hanging them?

Filed Under: Decorating, Household Tagged With: decorating

Decorating: Hanging Wall Art – Part 1 of 3

September 23, 2013 by Tracy

Decorating: Hanging Wall Art – Part 1 of 3

Decorating: Hanging Wall Art – Part 1 of 3Downstairs in our living room, we hung a beautiful mirror above our fireplace when we decorated that room many years ago. Our 19″ television set resided on a small round end table with toys about.

This arrangement worked until we purchased a Wii. Trying to play the games on that little screen was tough for one player and nigh impossible with multiple-player games.

Our solution was to upgrade to a 40” flat panel television when we found a fantastic sale. When our television arrived Christmas of 2011, we moved the mirror to our half bathroom wall and installed the television above our fireplace.

Since the mirror was larger than the television, the white holes on either side of our television glare at me from the wine-colored wall. Though we tried to patch them a bit, we will fix them permanently whenever we re-paint our living room.

Not desiring to see anymore holes in walls than needed, I am so careful about where I hang items in our house. I know that holes can be patched. But I also know that if I plan, then I may be able to prevent extra holes in our walls which will save us time and maintenance.

When I need to hang items on a wall, I have learned to follow these three steps:

  • Step One: Experiment with the Wall Art Arrangement

  • Step Two: Sketch the Wall Art Arrangement

  • Step Three: Hang the Wall Art Arrangement

Step One: Experiment with Wall Art Arrangement

Before getting the hammer, nails, or pencil, I experiment with the arrangement on the floor. I arrange it and rearrange it. Trying out all sorts of arrangements until I find the one I really like. Then I leave it on the floor for a few days.

I then try to rearrange it again. If I come up with another option, then I repeat the process by leaving it on the floor for a few days.

Once I have the arrangement I like best and have tried other options only to come back to this arrangement, then I move on to step two. This process takes me a week or more, but I enjoy the discovery of finding pleasing designs without putting holes in our walls.

As designing and decorating our home is fun, I do take my time to get it right the first time. In using time wisely, I find experimenting with the wall art creative and beneficial in my process to get the decor from the box to the wall. Happy decorating!

Question: How do you experiment with wall art arrangements?

Filed Under: Decorating, Household Tagged With: decorating

Welcome to Using Time Wisely!


Presenting organizational tips and tricks to save you money, energy, and time.

To access 5 Ways to Using Time Wisely Today, click "like" on my facebook page and join in on the journey of Using Time Wisely.

Looking for something?

Email Newsletter

Sign up to receive email updates and to hear what's going on with us!

Copyright © 2025 · Lifestyle Pro Theme on Genesis Framework · WordPress · Log in