• Home
  • About Tracy
  • Contact Me

Using Time Wisely

Organized to save money, energy, and time

  • Email
  • Facebook
  • Pinterest
  • RSS
  • Twitter
  • YouTube
  • Document Organization
    • Overview
    • Box 1
      • Credit Report/Cards
        • Credit Reports
          • Credit Updates
          • Credit Scores
        • Credit Cards
      • Personal
      • Home Ownership
      • Vehicles
    • Box 2
      • Life Insurance
      • Major Medical
      • Tax-Favored Programs
      • Prescriptions
      • Dental & Vision
      • Special Health Policies
      • Short-term Disability
      • Long-term Disability
      • Personal Insurance
    • Box 3
      • Social Security Documents
      • Retirement
      • Investments
      • Estate Planning
      • Tax Records
  • Household
    • Cleaning
    • Maintaining
    • Organizing
    • Scheduling
      • Laundry
  • Event Planning
    • Assisting
    • Attending
    • Coordinating
      • Birthday Party
      • Christmas
      • Dinner Party
      • Fall Festival
      • Field Trip
      • Lemonade Stand
      • Thanksgiving
    • Learning
    • Preparing
    • Serving
  • Miscellaneous
    • Communication
      • Customer Service
      • E-mail
      • RSS Feed Reader
    • Goals
    • Organization
    • Time Management
      • To Do List
  • Food
    • Food Prep
    • Grocery Shopping
      • Lists
      • Pricing
    • Menu Planning
    • Recipes
    • Stockpile
  • Family Activities
    • Going Out
      • Free Outings
      • Inexpensive Outings
      • Summer
    • Rewards
      • Good Grades
      • Reading
      • Summer Reading
    • Staying at Home
  • Stretching Your Dollars
    • Daily Deals
      • Groupon
      • LivingSocial
    • Drugstores
      • CVS
    • Gas Prices
    • Gifts
    • On-line Shopping
    • Pictures
    • Products
    • Restaurants
    • School Items
    • Tips
You are here: Home / Archives for grocery shopping

Grocery Shopping: Giving Groceries a Home – Part 2a of 3

December 15, 2011 by Tracy

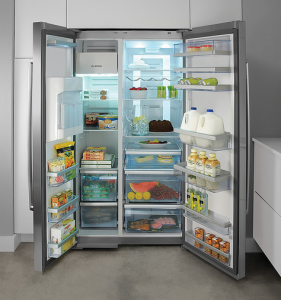
Photograph Credit: Flickr (Bosch Appliances)

Even after eating a cookie while grocery shopping, my children are usually STARVING by the time we walk into the house. Not sure if it is all the food they see, or just the time of day. Whatever it is, they are hungry.

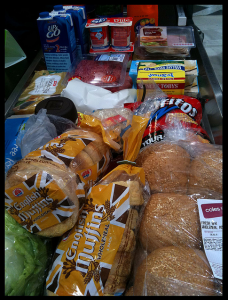
Upon sending them to the pantry for nourishment (ahem) or junk food, I concentrate on the counter full of groceries that I just unloaded. Before giving my pantry items a home (which will be covered in Part 2b), I turn my attention to the cold items which will be placed in the refrigerator or freezer.

Organizing the Refrigerator

Each shelf or drawer in my refrigerator holds certain items. By keeping the same system, I can quickly put items away and retrieve them while preparing meals and snacks. Though there are exceptions to these guideline when hosting parties, holidays, and other events, my refrigerator contains the following items on each shelf or in each drawer:

    • Shelf #1 – beverages
    • Shelf #2 – butter, eggs, bread, and sourdough starter
    • Drawer #1 – cold cuts and bread dough
    • Shelf #3 – yogurt, sour cream, and cream cheese
    • Shelf #4 – leftovers
    • Drawer #2 – fruits (apples, oranges), vegetables (potatoes, carrots), and spice (garlic)
    • Drawer #3 – all cheeses

As I put the cold items away, I will stack new items on the bottom or in the back of existing products. By doing so, the older item gets used prior to the new container being opened. Though this is the goal, I currently have two opened jars of apple sauce on the fourth shelf in my refrigerator. 🙂

Organizing the Freezer

If I will be using the frozen item in the next week, then I place it in the freezer side of my side-by-side refrigerator in the house. All the other frozen items are place in our chest freezer housed in the garage. Again, having an organized system helps the “putting away” to go quickly. I have our chest freezer organized as follows:

Left side

    • Packaged meats (ham, turkey, bacon, chicken, hot dogs, sausage)
    • Boxed meals

Center basket

    • Hamburger
    • Roasts
    • Steaks

Center bottom

    • Pizzas
    • Breads
    • Desserts
    • Double batch cooking (For some meals, I make multiple portions to save for busy nights.)

Right side

    • Vegetables
    • Pork chops
    • Breakfast foods

When I put these items away, I place the newer items on the bottom or in back of other existing product. Any meats that need to be cut up or packaged together (i.e., chicken, pork chops, etc.), I put in the refrigerator until after all the groceries are put away. Then during meal preparations, I will divide up the hamburger, pork chops, etc., wrap, and place them in the chest freezer.

With all the cold items placed in the refrigerator or freezer, I can then concentrate on meeting my children’s needs. After addressing their starving situation and refilling their drinks, I then continue giving the other groceries a home which will be covered next week. In using time wisely, I have a designated spot for each type of item. This system works for me. Hope it works for you as well. Happy organizing!

Question: Do you designate shelves and drawers for specific items in your refrigerator and freezer? Please add your answer to the comments.

Filed Under: Grocery Shopping, Food Tagged With: food, grocery shopping

Grocery Shopping: Giving Groceries a Home – Part 1 of 3

December 8, 2011 by Tracy

Photograph Credit: Flickr (Jerry Whiting)

Are you seeing any increase in your savings? Have you implemented any changes to your typical grocery shopping trips? Though saving 40-60% each week is my goal, be thrilled with saving 10-20% as you implement a new savings strategy. Saving little by little will add up as you continue to find tricks that work for you.

As we near the end of this series on my food cycle, here is a quick overview up to STEP SIX out of seven total steps:

My Menu Planning Process

Step One: Choosing a menu plan.

Step Two: Adding meals to your plan from the food you have on hand.

Step Three: Continuing to add meals.

My Grocery Shopping Process

Step Four: Creating grocery lists.

    • Part 1: Identify needed items.
    • Part 2: Select sale items.
    • Part 3: Compile a list for each store.

Step Five:  Gathering your savings.

    • Part 1: Entering the store.
    • Part 2: Shopping your list.
    • Part 3: Checking out.

Step Six: Giving your groceries a home.

    • Part 1: Unloading your savings.
    • Part 2: Organizing your savings (future post).
    • Part 3: Preparing for future savings (another future post).

Surviving the grocery store process with three active children and lots of savings, I return to give my savings a home. Before relaxing on the couch with a little one on each side, there is still work to be done. Having accomplished deep savings, I do not want these groceries to spoil. Therefore, I begin unloading all these savings.

Unloading the car

With my children occupied either inside or outside, I begin by bringing in the bags and boxes. My long kitchen counter holds most of the bags. If I need additional space, I will either moved to the counter by the refrigerator or place my non-food savings on the floor. Once my vehicle is unloaded, I close the trunk, car doors, and garage door before returning to the kitchen.

Unpacking the groceries

With the bags on the counter, I start at the beginning of my counter as I walk into my kitchen by taking all the items out of the bag and placing them on the counter. The bag is then either folded (reusable) or tossed on the floor (plastic) for later. When one bag is done, I then proceed to the next until all the groceries are on the counter and all the bags are off.

Unloading the car and unpacking the groceries on my counter allows me to see where I need to concentrate. The next post in this series will explain how I organize my savings from this point. Though this process seems to take quite a bit of time, the more it is repeated, the quicker I become.

This process works for me. If you have a small space in which to work, then find a system that helps you be efficient. Willing to try a new way of doing things helped me save 40-60% off my grocery bill. You can do the same. Just be willing to try. Happy experimenting!

Question: What odd-to-you idea have you tried that really worked beyond your expectations? For me, making a menu with what I had on-hand and then shopping only the sales was a “weird” idea that really works! Now I cannot go back to paying full price for items that will soon be on sale. Keep your comments coming! Love to hear your answers.

Filed Under: Grocery Shopping, Food Tagged With: grocery shopping

Grocery Shopping: Gathering your Savings – Part 3c of 3

November 24, 2011 by Tracy

Photograph Credit: Flickr (Bethany Lynne)

Battling the grocery stores this week was a bit tricky with all the shoppers gathering their savings for their Thanksgiving feasts. With my grocery list in hand, a plan of action, and patience maneuvering through the aisles, I gathered my savings, chose a checkout station, and used my coupons before paying for my purchases. Then before leaving the store, I made sure to check the receipt and request any rain checks.

Checking the Receipt

Though there are times when I need to quickly leave the store and I choose to check my receipt at home, I usually take the time to check my receipt at the store. If I find a problem, then I can address it immediately. When checking the receipt, I look for these savings:

1. Verify that all qualifying coupons doubled. Sometimes when a coupon is entered manually, the cashier must also manually enter the amount to double. Having caught a few errors from lack of doubled coupons, I scan my receipt immediately after checkout. If I find an error, I go to customer service for my reimbursement.

NOTE: Knowing your store’s coupon policy is the key. In my area, Bi-Lo doubles coupons up to $.60 whereas Publix doubles up to $.50. If I use a $.55 coupon at Bi-Lo and did not receive the extra coupon credit from doubling, then I will be stopping by customer service.

If I used the same coupon at Publix, I will not use my time to address this issue with customer service since the coupon did not qualify for doubling.

2. Check rain check amounts. Recently, I used a rain check for 6 frozen vegetable items. Out of the 6 boxes I purchased, 2 of them were on sale the week I used the rain check. When the cashier adjusted the prices for the Buy One Get One Free rain check, he used the sale price. By checking the receipt, I realized the error and proceeded to customer service. The error was quickly rectified, and I received a $1.85 refund.

3. Confirm promotional points. As a provider of Fuelperks! awards, Bi-Lo runs specials for bonus points. When I purchase a deal with bonus Fuelperks!, I will check the receipt to be sure the additional points are added to my total. Thus far, all our Fuelperks! have been calculated correctly. However, if there is a problem, I would address it immediately at customer service.

4. Scan the entire receipt to find reusable bag credits. At stores that give credit for using reusable bags, the credit can be listed anywhere on that receipt. I have found the credit up with the checked-out items as well as in the coupon section. Before requesting an additional credit, I verify with the cashier that the credit was given. Then I inspect the receipt to find the credit to be sure all the credits were entered.

Requesting Rain Checks

Before leaving the store, I will check my grocery list. If there are any items that I planned to purchase but the store shelf was empty, then I swing by customer service. At the counter, I will request a rain check for the out-of-stock item with the quantity needed. Each store is different. Some Publix representatives write the rain check for the exact flavor while other representatives just list the item.

TIP: For items that your family eats often, consider getting a rain check if one of the flavors is out-of-stock. For example, when Publix was running a sale on Pepperidge Farm Goldfish for $1 per bag, I brought 6 coupons for $.55 off (not subject to doubling).

When I arrived at the cracker aisle, I found that all the baby goldfish bags were out-of-stock. Since these are my youngest daughter’s favorites, I made a note on my grocery list, chose 6 bags of other available flavors, and used my 6 coupons. After checkout, I requested a rain check for 6 more bags of the baby goldfish.

Within 2 weeks, I had gathered another set of 6 coupons and used my rain check to extend those savings on a week when the goldfish were not on sale. (No, we did not eat all the goldfish within 2 weeks. However, I do stock up at this rock bottom price since this sale only comes around every few months.)

In using time wisely, a little time to scan the receipt can increase your savings. By making sure the transaction is accurate before leaving the store, you can save money (by correcting the errors), energy (from explaining the error from a previous visit), and time (stopping by customer service before the next shopping trip). Though these little details take time, I find these moments using time wisely. My children enjoy asking for stickers while we wait for rain checks to be written, and they are learning the value of checking the receipt and requesting rain checks. Happy savings!

Question: What errors have you found on your receipts? Please add your answer to the comments.

Filed Under: Grocery Shopping, Food Tagged With: grocery shopping

Grocery Shopping: Gathering your Savings – Part 3b of 3

November 10, 2011 by Tracy

Photograph Credit: Flickr (flying ember)

Between the rushes to stand in front of the screen showing the savings and asking for my credit card to swipe at the end of our transaction, my children enjoy the checkout process. My daughter is also sure to ask for stickers at some point during our transaction.

When we left off last week, we had shopped, chosen our checkout lane, and unloaded our groceries onto the conveyor belt. We then waited for the cashier to begin our transaction.

Ready to Begin

With all the items in the correct order on the conveyor belt, I hold in my hands:

1. My loyalty card. I keep these cards on my key chain. When the cashier begins my transaction, I hand him/her my loyalty card to scan for extra savings.

2. My coupons. Some cashiers want the coupons at the beginning of the transaction while others take them at the end. I keep my coupons in my hands, visible for the cashier to see. If the cashier requests the coupons early in the transaction, I can easily comply.

While Items are Scanned

1. Request bag credit. At Bi-Lo, I need to request the bag credit for using my reusable bags. If I do not request it, then I will not get the credit. After a few items have scanned, I ask the cashier for my bag credits. Usually the cashier will type in the discount when asked.

2. Retrieve my credit card for payment processing. My children then take turns holding the card.

Near the End of our Order

1. Present all Rain Checks. If I am using a rain check, I inform the cashier before he/she arrives at the item(s). I then present the rain check for the correct calculation.

2. Present any Coupons for a Free Product. For these coupons, I inform the cashier, so he/she can take note of the price for the coupon validation.

When Total is Announced

1. Present all Coupons. I then check to be sure all the coupons are deducted. I also check to be sure doubling occurred on coupons $.60 or less.

2. Enjoy watching the savings increase. While the coupons are subtracted, our family enjoys watching the total dwindle.

3. Make payment. When the total is given after all coupons deducted, I will pay the remaining amount and accept my receipt.

This process has worked for me. There have been shopping trips where I have been unprepared and forgotten to redeem coupons. I know, shocking, but it happens. With a plan in place, I rarely forget a savings strategy. After many trial and errors, this system continues to work for me. Try your own system to see what works for you. Be encouraged as you see your savings increase. Happy savings!

Question: What is your favorite part of checkout? Please add your answer to the comments.

Filed Under: Grocery Shopping, Food Tagged With: grocery shopping

Grocery Shopping: Gathering your Savings – Part 3a of 3

November 3, 2011 by Tracy

Photograph Credit: Flickr (Kel Obrien)

As I finish gathering the last items on my grocery list and I head up to the registers, I make note of any rain checks that need to be requested, and I move any coupons that I will not use on this visit to the back of my envelope.

By the time I get to the register, I have the coupons I plan to redeem ready to hand to the cashier. My checkout process takes place in three phases: prior to checkout, during checkout, and after checkout.

Prior to Checkout

1. At the registers, I make the following choices:

    • Bypass the express lanes. Even if I only have 9 items, I will not use the express lane if I plan to use coupons. The extra time it takes at the register will hold up other customers that need to get in and get out of the store. Now if I am only purchasing “buy one get one free” items without coupons and I have a few items, then yes, I will use the express lane.
    • Walk pass the self scanners. With coupons, the self scanners require the cashier to take the coupons. Since there is one cashier for four terminals, the cashier will get overloaded with my coupons. In consideration of the grocery store staff, I choose not to use the self scanners while shopping with coupons.
    • Select my register based on the cashier. Having shopped each week at my favorite grocery stores, I have my favorite cashiers.

Even if I have to wait for an extra few minutes, I prefer the store bookkeeper or customer service representative. If there are customers waiting, these employees will open a register to help out.

The bookkeeper or customer service representative has the authority to override the system. When I use a Publix coupon at Bi-Lo, a manager or customer service representative is needed to override the transaction. If that employee is already running a register, then checkout is quick and easy.

2. After choosing the checkout lane, my son and I unload the grocery cart onto the conveyor belt. In this order:

    • Reusable bags
    • Freezer and refrigerated items
    • Boxed and canned items
    • Breads, chips, and bakery items
    • Cleaning items
    • Rain check and “free with coupons” items

If I am using a rain check from a prior visit, then the cashier will need to override the price of the item. I keep these items at the back of the pack, so I have time to warn the cashier before getting to those items.

Also, if I am using a coupon for one free pack of mashed potatoes, then the cashier will need to enter that price. I hold those items until the end, so that I can get the coupon and rain checks ready while the cashier is scanning the other items.

Prior to checkout, I choose the best lane and place my items on the conveyor belt in order. Having an order and a plan during checkout helps the process to proceed without forgetting or missing an opportunity for savings. As you plan your shopping trip, remember to plan your checkout process as well. Happy savings!

Question: What opportunity of savings have you missed because you were not organized at checkout? Please add your answer to the comments.

Filed Under: Grocery Shopping, Food Tagged With: savings, grocery shopping

« Previous Page
Next Page »

Welcome to Using Time Wisely!


Presenting organizational tips and tricks to save you money, energy, and time.

To access 5 Ways to Using Time Wisely Today, click "like" on my facebook page and join in on the journey of Using Time Wisely.

Looking for something?

Email Newsletter

Sign up to receive email updates and to hear what's going on with us!

Copyright © 2025 · Lifestyle Pro Theme on Genesis Framework · WordPress · Log in