• Home
  • About Tracy
  • Contact Me

Using Time Wisely

Organized to save money, energy, and time

  • Email
  • Facebook
  • Pinterest
  • RSS
  • Twitter
  • YouTube
  • Document Organization
    • Overview
    • Box 1
      • Credit Report/Cards
        • Credit Reports
          • Credit Updates
          • Credit Scores
        • Credit Cards
      • Personal
      • Home Ownership
      • Vehicles
    • Box 2
      • Life Insurance
      • Major Medical
      • Tax-Favored Programs
      • Prescriptions
      • Dental & Vision
      • Special Health Policies
      • Short-term Disability
      • Long-term Disability
      • Personal Insurance
    • Box 3
      • Social Security Documents
      • Retirement
      • Investments
      • Estate Planning
      • Tax Records
  • Household
    • Cleaning
    • Maintaining
    • Organizing
    • Scheduling
      • Laundry
  • Event Planning
    • Assisting
    • Attending
    • Coordinating
      • Birthday Party
      • Christmas
      • Dinner Party
      • Fall Festival
      • Field Trip
      • Lemonade Stand
      • Thanksgiving
    • Learning
    • Preparing
    • Serving
  • Miscellaneous
    • Communication
      • Customer Service
      • E-mail
      • RSS Feed Reader
    • Goals
    • Organization
    • Time Management
      • To Do List
  • Food
    • Food Prep
    • Grocery Shopping
      • Lists
      • Pricing
    • Menu Planning
    • Recipes
    • Stockpile
  • Family Activities
    • Going Out
      • Free Outings
      • Inexpensive Outings
      • Summer
    • Rewards
      • Good Grades
      • Reading
      • Summer Reading
    • Staying at Home
  • Stretching Your Dollars
    • Daily Deals
      • Groupon
      • LivingSocial
    • Drugstores
      • CVS
    • Gas Prices
    • Gifts
    • On-line Shopping
    • Pictures
    • Products
    • Restaurants
    • School Items
    • Tips
You are here: Home / Archives for spring cleaning

Spring Cleaning: Track, Sills, and Baseboards – Oh Yuck!

April 30, 2012 by Tracy

Photograph Credit: Microsoft Images

Though I am not where I want to be with my spring cleaning, I am not where I started. My kitchen sink, beds, and medicine cabinet show the results of my housework.

In entering our busiest month of the year, I may need to put the spring cleaning on hold until school is out. May is just full of last-minute field trips, school programs, soccer season for my two older children, and end-of-year parties.

A few things still remain on my spring cleaning to do list. These items include the following:

Sliding Glass Door Track

This track gets quite filthy from season to season. Since it has been about a year since cleaning the track, it needs to get done.

Window Sills

With little black smudges from tiny fingers, my window sills need some attention. Some sills just need a good dusting and a squirt of Windex. Other sills need the Mr. Clean magic eraser for those stray crayon and pencil marks. 🙂

Baseboards

No matter the size of your residence, you have more baseboards than you think you have. Though I try to clean the baseboards when I clean each room, I know I miss some.

Concentrating on the baseboards once or twice a year keeps the dust bunnies away.  Though my baseboards probably need a new coat of paint, I will focus on getting them clean before beginning any new projects.

Keeping the house clean, organized, and uncluttered is a full-time job. With a running To Do list that never gets completed, I understand how the mundane gets tiring.

When I get burned out, I stop and think about why these tasks are on my list. Usually it is because my family operates more efficiently when there is clean laundry in the closets and drawers, clean dishes in the cabinets, food on the table, non-sticky floors in the bathroom, and space to run and play.

In using time wisely to organize your household, you are investing in the lives of your family. Take courage. Those little projects matter even if no one else notices. Hang in there, and happy spring cleaning!

Question: What projects still remain on your spring cleaning list?

Filed Under: Cleaning, Household Tagged With: spring cleaning

Spring Cleaning: Medicine Cabinet

April 23, 2012 by Tracy

With the rain showers, cooler weather, and a desire for a clean home, I am in spring cleaning mode. Last week, I shared 7 Steps to Making a Bed which help in using time wisely each morning.

Today, I will give you a peek into my medicine cabinet. By purging these items, I know I can use any product in my medicine cabinet without wondering if the medication has expired.

Last weekend as I began to clean my children’s bathroom, I got distracted. Let’s just say, I still need to get that bathroom clean. But, I made some progress.

As I began dusting the fixtures, I found myself moving around medications that have sat on top of our medicine cabinet for a few years. Yikes!

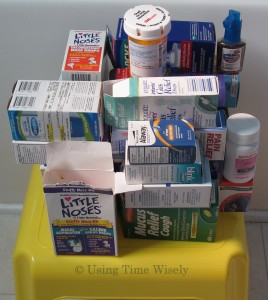
Realizing how long those items had been up there, I decided to check the expiration dates. Of course, once I began, I had to finish. So, I went shelf by shelf and separated the current medications from the expired packages. When I finished I had this pile of expired medications to rid from our household.

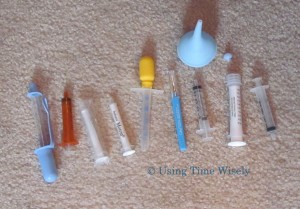
I then found these items that I thought we no longer needed.

After tossing them out, I wish I had saved two of those applicators as my son needs to take medicine to school this week. Though having those two extra would be nice, I do not need them as I can rotate between the ones I have. 🙂

TRACY’S NOTE: Sometimes having less uses more time, but I had to make a choice. To be honest, I had not used these applicators and thermometers in at least two years. After this week, I may not use them again for another year.

Removing the excess and the clutter outweighs the off-chance I will need those extra ones. But keeping two alternates meets my family’s needs.

The next step was organizing the current medications and placing them back into the medicine cabinet. I then made a list of items that I would like to replenish. This list stays on my desk where I make out the grocery and drug store lists. I can quickly refer to my list and check for sales.

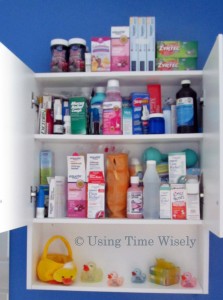
Are you ready for the results? I began with a full medicine cabinet that included boxes on top of the medicine cabinet and ended with empty spaces on the inside shelves.


Before                    and                      After

As you spring clean your home and find those areas that just need a little extra tender loving care, remember your medicine cabinet. Keeping current medications stocked prevents the emergency run to the drugstore which saves money, energy, and time.

Though I got distracted, I tackled the medicine cabinet which for me was using time wisely. Happy spring cleaning!

Question: How many applicators would you have kept?

Filed Under: Cleaning, Household Tagged With: spring cleaning

Spring Cleaning: 7 Steps to Making a Bed

April 16, 2012 by Tracy

Photograph Credit: Flickr (Yew Tree House)

Somehow just making the bed brightens my bedroom. I can have everything picked up but the room still looks messy with a disheveled bed.

I realize there are days when just flinging the comforter over the sheets will have to do. I get that because it happens at my house, too.

But during spring cleaning, I want to wash all the linens and setup the beds correctly. To get the same look each day, I follow these 7 steps to making a bed.

Step 1: Bed Skirt

For the master bedroom, we place a bed skirt on the box spring to keep dust from collecting under the bed and to hide the contents under our bed. Since the bed skirt gets dusty, I strip the bed completely and wash all the linens including the bed skirt.

When time to replace, I lay the bed skirt out on the box spring with the ruffle falling on the left, bottom, and right of the bed. The straight edge lays across the top of the bed by the headboard.

Step 2: Flip the Mattress

If your mattress needs flipping like ours, I get help when putting the bed back together. With the mattress in place, I check the bed skirt for alignment and make any adjustments. I like to keep the bed skirt even all the way around the bed.

Step 3: Mattress Cover/Pad

Mattress Cover

At one time we placed a plastic mattress cover on the mattress. However, the bed crinkled when we turned over and stayed warm. The heat would be fine during the winter, but during the summer months, the bed was uncomfortable. So, I took the mattress cover off.

Mattress Pad

To protect our mattress, we place a quilted mattress pad over the mattress. After washing, I place the pad on the mattress using the “X” pattern.

The “X” pattern: Start at the top of one corner and then stretch the pad to the opposite bottom. Then I repeat on the other side.

By working in an “X” pattern, the pad does not slip off the mattress. Of course, when I have help, the task goes quicker.

Step 4: Fitted Sheet

When working alone, I work in the “X” pattern. The sheet stays in place without slipping off the mattress pad.

Step 5: Cover Sheet

I place the wide hem of the cover sheet at the top of the bed with the “good” side facing down. I then fold the top down a few inches. Making sure that the sheet is even on both sides, I then tuck the sheets under the foot of the bed.

TIP: If you have a tight fit or newly polished nails, then consider using a wooden spoon to tuck in the sheets.

If you want to make hospital corners, here is a great pictorial post for that angled look.

Step 6: Comforter

During the winter, we sometimes keep a blanket over the fitted sheet, but usually just our comforter lies on top. When adding to the layers of the bed, I try to keep the comforter even on both sides and cover the sheets. If the cover sheet is hanging down, then I get the wooden spoon or just tuck the sheet under the mattress.

Step 7: Pillows

When placing the pillows into the pillowcases, I prefer to insert them tag-side first. This little trick saves me time tucking the tag in when making the beds in the morning.

I also place the pillows that go in the shams inside pillow protectors. These plastic sleeves protect the pillows which keeps them in good shape for a long time.

With the linens washed and placed on the bed, making the bed only takes a few minutes. By working on one side and then moving to the other side, I can make our bed in about 2 minutes. But if the sheets are falling off the mattress cover and rolled into a ball, then making the bed will take more time.

In using time wisely, I concentrate on setting up the bed to save time while making the beds most mornings. 😉 Happy spring cleaning!

Question: What other tips do you have for using time wisely while making your bed? 

Filed Under: Cleaning, Household Tagged With: spring cleaning

Spring Cleaning: Removing Black Marks from a White Kitchen Sink

April 9, 2012 by Tracy

Spring has sprung! With new organized spaces after completing Project Simplify Week 1, Week 2, Week 3, and Week 4, I need to clean some key areas of my home.

Welcoming the cool breeze by opening our windows, I get motivated to spring clean. During this time, I like concentrating on specific areas that get used often, but not cleaned often enough. The first area needing some tender loving care elbow grease is my kitchen sink.

Kitchen Sink Marks

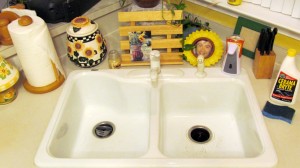
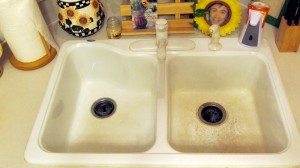
Our sink is white and shows all the dirt, grime, and metal marks from pots and pans rubbing on the white finish. Removing black marks from a white kitchen sink is easy when you know how to clean it.

Finding a Cleaning Solution

When we first moved into our home, I remember the first mark on the sink. I scrubbed with soap and water to no avail. I then tried a spray-on cleaner, like Fantastic, which only cleaned the surface and left the mark.

Without finding a quick solution, I turned to my computer to search for an answer. Surprised to find no help, I looked to the manufacturer and home improvement stores.

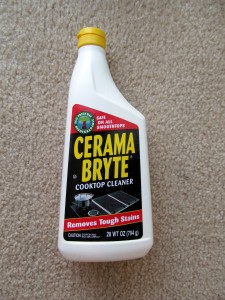
Finally, I discovered that the gentle cleaner for our smooth-top stove removes these marks. Yeah!

A few years later, our sink drain backed up, and Paul treated the clog with Drano. The Drano completely removed all those stubborn marks without any effort on my part.

Though the Drano worked, the fumes were strong, so I choose to clean with the smooth-top stove cleaner (any brand will do).

Cleaning our White Kitchen Sink

1. Drizzle the cleaner inside both sides

2. Use a no-scratch sponge to wipe the sides and bottom

3. Rinse with lukewarm water

4. Repeat for any stubborn marks


Before         and           After

Much better! My sink definitely needed to be clean. With just a few minutes, you can spring clean, too. Within 10 minutes I had my kitchen sink sparkling white. Knowing I accomplished this task today motivates me to choose another small task to improve our home while using time wisely. Happy spring cleaning!

Question: What item are you spring cleaning this week?

Filed Under: Cleaning, Household Tagged With: spring cleaning

Welcome to Using Time Wisely!


Presenting organizational tips and tricks to save you money, energy, and time.

To access 5 Ways to Using Time Wisely Today, click "like" on my facebook page and join in on the journey of Using Time Wisely.

Looking for something?

Email Newsletter

Sign up to receive email updates and to hear what's going on with us!

Copyright © 2025 · Lifestyle Pro Theme on Genesis Framework · WordPress · Log in